
Custom Field Populator for BigCommerce
🔧 Quick Info: Custom Field Populator helps you create, manage, import, and clean up BigCommerce product custom fields — one product at a time or across your whole catalog. This guide walks through every page in the app.
Contents
- Plans at a glance
- Getting started
- Dashboard
- Product Fields Editor
- Custom Fields
- Custom Field Rules
- Importing custom fields from a CSV
- Exporting custom fields
- Clean Up
- Schedules
- Snapshots
- Activity & background tasks
- Billing & plans
- Settings
Plans at a glance
Custom Field Populator has two plans: Basic and Premium. Every feature below appears in the app’s sidebar or on its pages; anything your plan doesn’t include is either hidden or shown with an upgrade prompt.
| Feature | What it does | Basic | Premium |
|---|---|---|---|
| Product Editor | Select products and edit their custom fields directly, without an import. | ✓ | ✓ |
| Advanced Product Filters | Filter the product list with rule-based conditions and turn them into Custom Field Rules. | ✓ | ✓ |
| Scheduling | Schedule custom field imports and rule-based updates. | Up to 1 active schedule | Up to 50 active schedules |
| Snapshots & Rollback | Back up all custom fields before bulk changes and restore with one click. | Up to 3 snapshots · 7-day history | Up to 50 snapshots · 30-day history |
| Custom Field Clean Up | Find and fix duplicate, similar, and case-mismatched custom fields. | — | ✓ |
| Find & Replace | Bulk find and replace custom field values across products. | — | ✓ |
| Health Report | Weekly email digest of new custom field issues found in your store. | — | ✓ |
Current pricing is always shown on the Compare Plans page inside the app (open Billing → Change Plan). You can upgrade at any time and the change takes effect immediately; downgrades take effect at the end of your billing period. See Billing & plans.
Getting started
1 Install Custom Field Populator
Install Custom Field Populator from the BigCommerce marketplace. The app opens inside your BigCommerce control panel.
2 Complete setup
On first launch you’ll complete a short setup screen:
- Choose Your Plan — pick Basic or Premium. Each card lists exactly what’s included.
- Billing Information — review your name, email, and address, and use Edit to correct anything.
- Payment Method — enter a card and click Complete Payment. A card is required even when a free trial applies; to avoid being charged, uninstall the app before the trial ends.
3 Dashboard
After setup you land on the Dashboard.
Your store’s existing custom fields are imported automatically when the app is installed, so you’ll see them in the app right away — no setup needed.
The sidebar is organized as:
- Dashboard, Product Fields Editor, Custom Fields, Custom Field Rules
- Tools — Clean Up, Schedules, Snapshots
- Account — Activity, Billing, Settings
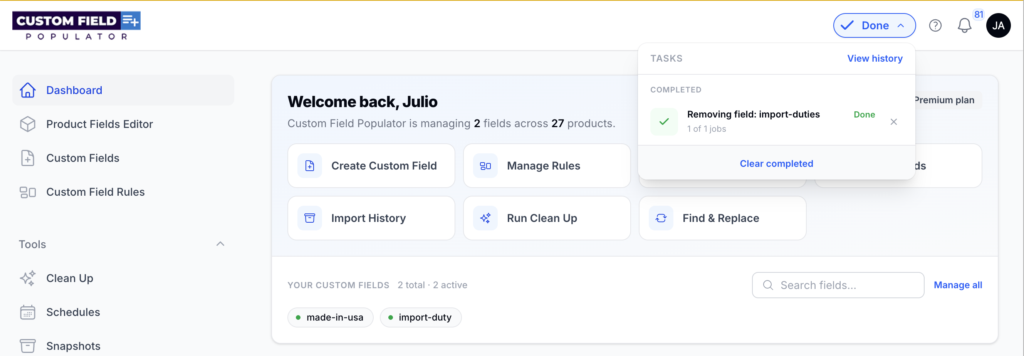
The ? icon in the top bar opens our help site, and the Tasks pill next to it shows live progress for background jobs (see Activity & background tasks).
Dashboard
The Dashboard is your home base: a summary of what the app is managing, quick actions, and live widgets.
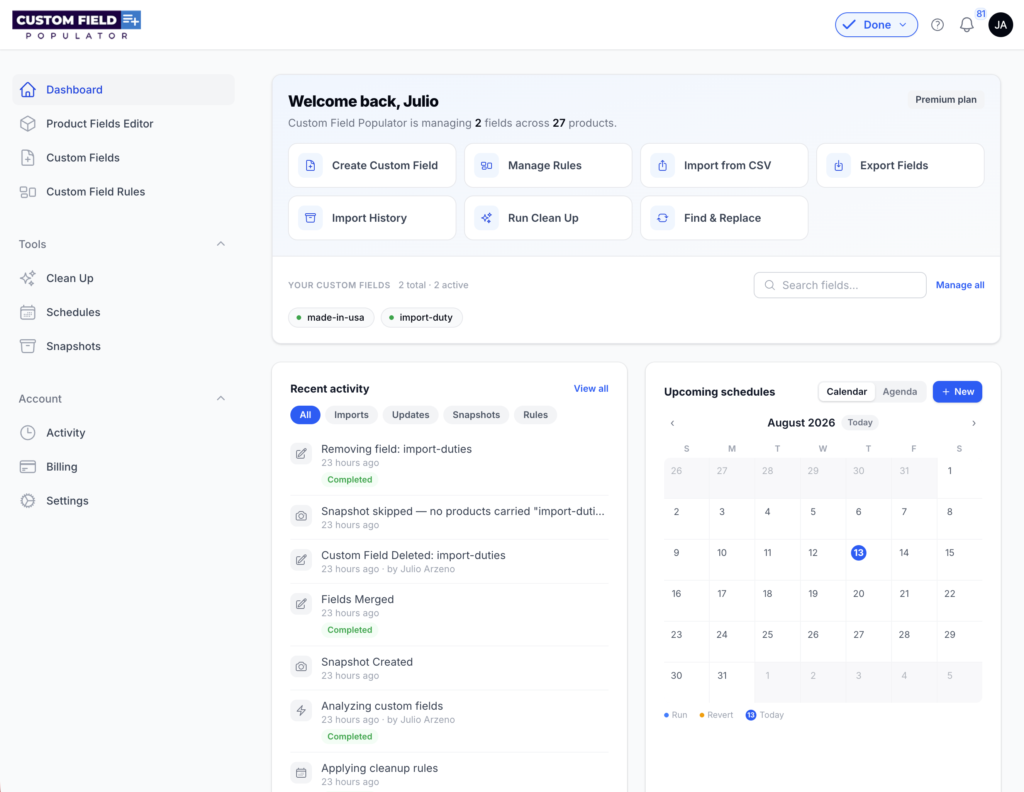
Welcome card. Shows how many fields and products Custom Field Populator is managing, plus your current plan badge. Quick action tiles jump straight into common tasks:
- Create Custom Field — opens the Custom Fields page.
- Manage Rules — opens Custom Field Rules.
- Import from CSV — opens the import wizard.
- Export Fields — opens the export wizard.
- Import History — opens your recent import log.
- Run Clean Up and Find & Replace — open the Clean Up page (Premium).
Your custom fields. A searchable directory of your fields. Type in the Search fields… box to filter; click any pill to jump to that field’s edit page. A green dot means the field is active, gray means inactive. Manage all opens the full Custom Fields list.
Widgets below the card:
- Recent activity — the latest actions in your store, filterable by All / Imports / Updates / Snapshots / Rules. Running jobs show a live progress bar. View all opens the Activity page.
- Upcoming schedules — a calendar (or agenda) of upcoming schedule runs and auto-reverts, with a New button to create a schedule. See Schedules.
- Clean Up findings — a preview of what the last analysis found, with a Run analysis button. On the Basic plan this widget shows real findings from your store with fixes locked behind Unlock Clean Up — so you can see exactly what Premium would tidy up. See Clean Up.
Product Fields Editor
Where: sidebar → Product Fields Editor
Browse your catalog and edit the custom fields on each product directly — one at a time or in bulk. Changes are applied to your store right away.
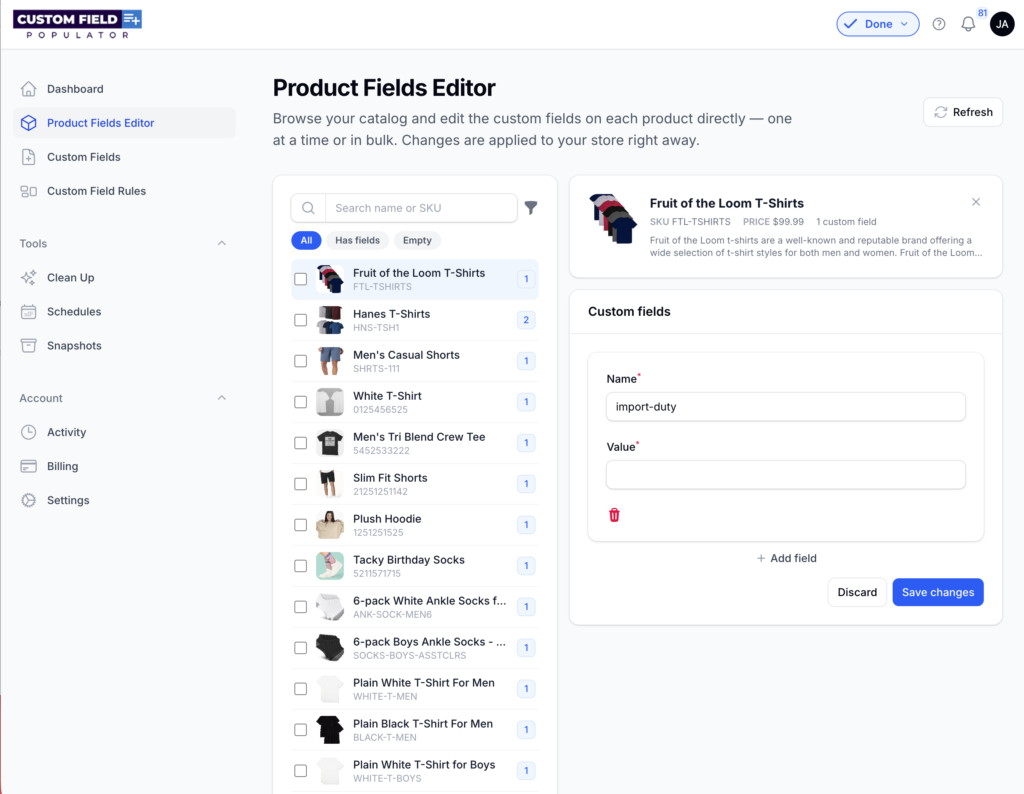
Browsing products
- Search name or SKU filters the list as you type.
- The All / Has fields / Empty chips filter the current page by whether products have custom fields.
- Each row shows the product, its SKU, and a badge with its custom field count.
- Use the page-size selector (15–100 per page) and Previous / Next to move through the catalog.
- Refresh (top right) clears cached product data and re-fetches the latest from your store. Its tooltip shows exactly when the current data was fetched.
Editing one product
1 Select a product
Click a product’s name in the list. The editor pane opens on the right with its details and current custom fields.
2 Edit the fields
Edit field names and values, click Add field to add rows, or remove rows you no longer want.
3 Save changes
Click Save changes. Changes are applied in the background and may take a moment to show. Discard resets the pane to the product’s current values.
Editing many products at once
1 Select products
Tick the checkboxes next to the products you want to edit (selections carry across pages).
2 Choose an action
The bulk editor lists every field found on the selected products, one row each. Choose an action per row:
- No change — leave the field alone (the default for existing rows).
- Set value — write this value to all selected products. If products currently disagree, the input shows Mixed values.
- Remove field — delete the field from all selected products.
3 Add new rows
Add new rows with Add row to create fields that don’t exist yet.
4 Apply
Click Apply to N products.
Below the editor, the Field coverage grid shows which selected products already have each field (✓ present, — missing) — handy for spotting gaps before you standardize.
Tip: before a big bulk edit, use Take snapshot first in the selection bar to back up the selected products’ current values (requires the Snapshots feature). You can choose Selected products or Entire catalog as the snapshot’s scope. If a snapshot is still being captured, saving is briefly blocked so your backup keeps the current values.
Advanced filters
Click the funnel icon to build rule-based filters — products must match all of your conditions. Filterable fields include Name, Price, SKU, Brand, Categories, Availability, Inventory Level, In Stock, Is Visible, Is Featured, Is Free Shipping, Weight, Condition, Product Type, UPC, MPN, GTIN, Keyword (name, SKU or description), Date Modified, and Date Last Imported. Numeric and date fields support a Between operator with From and To inputs.
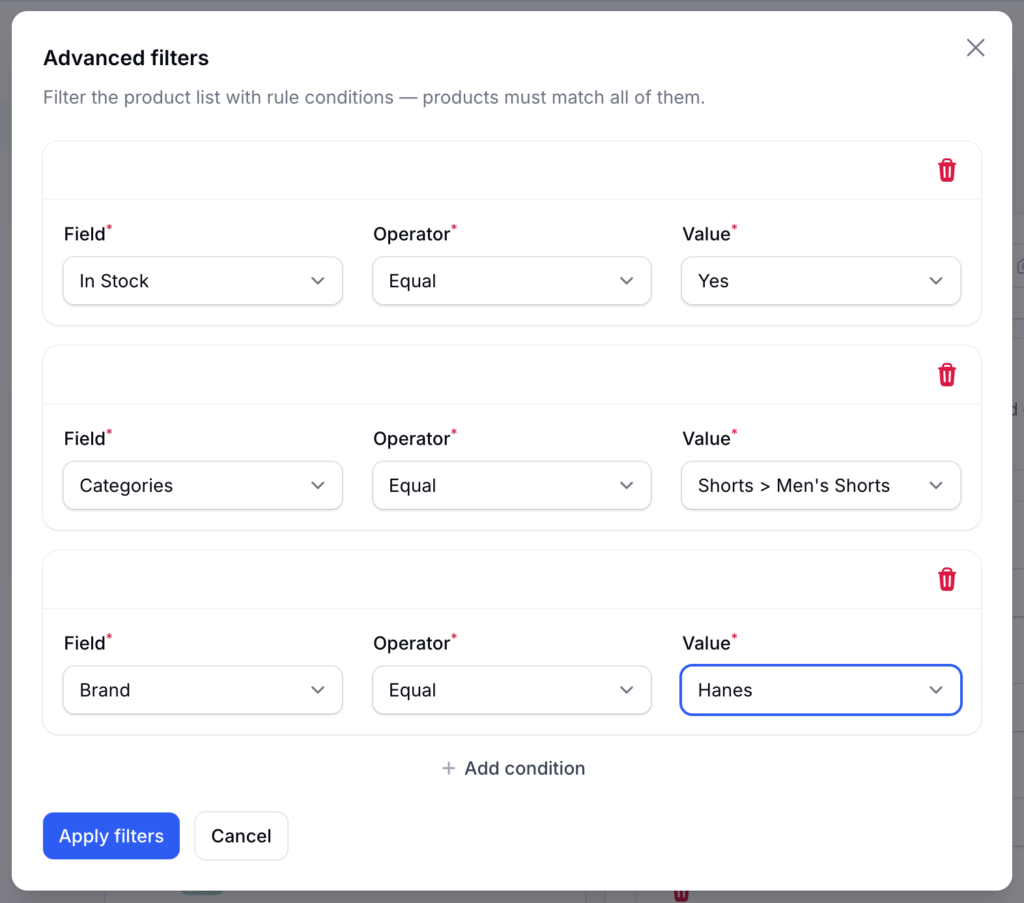
While filters are active, a banner shows the condition count with two extra options:
- Create from filters → Create Custom Field Rule — opens the Custom Field Rule creator pre-filled with your current filter conditions. Great for turning “products I just found” into an ongoing rule.
- Create from filters → Create Schedule — opens the Schedule creator as a rule-based update pre-filled with the same conditions (requires the Scheduling feature with a free schedule slot).
- Clear removes all filters.
Custom Fields
Where: sidebar → Custom Fields
This is the master list of the custom fields Custom Field Populator manages for your store.
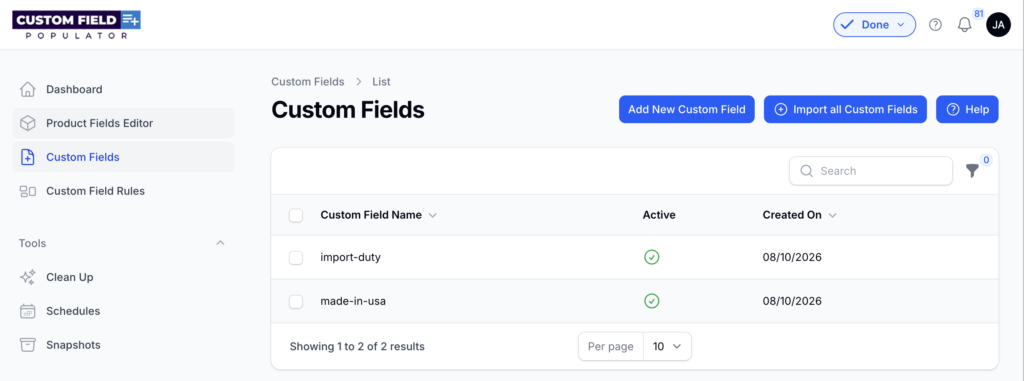
Creating a field
Click Add New Custom Field and fill in:
- Custom Field Name — must be unique in your store.
- Set a default value for this custom field? — by enabling, you can set a default value which will automatically be applied. Leave blank if no default value.
- Enabled/Disabled — disabling this custom field will stop it from automatically being added to new items. Disabling it will not remove it from items where it already exists.
- Add to a Custom Field Rule — enable to allow this custom field to be applied to products based on rules created in Custom Field Rules, then select the rule(s).
Useful actions
- Import all Custom Fields (list page) — re-imports all existing custom fields from your BigCommerce store into Custom Field Populator. This happens automatically when the app is installed, so you only need it to re-sync — for example, after creating fields directly in BigCommerce.
- Add Custom Field to all Products (edit page) — pushes this field onto every product right now.
- Archive Custom Field (edit page) — archives the field in the app. It remains on your products and in your store, but is hidden in the app. Archived fields can be restored from the list (Restore).
- Delete Custom Field (edit page) — removes the field from all items and from your store. This action is not recoverable.
- Remove from BigCommerce (bulk action) — removes the selected custom fields from BigCommerce while keeping them in the app. This action is not recoverable.
The list can be filtered by name, active state, and Archived status.
Custom Field Rules
Where: sidebar → Custom Field Rules
Rules assign custom fields to products automatically based on conditions — so new and matching products always get the right fields without manual work.
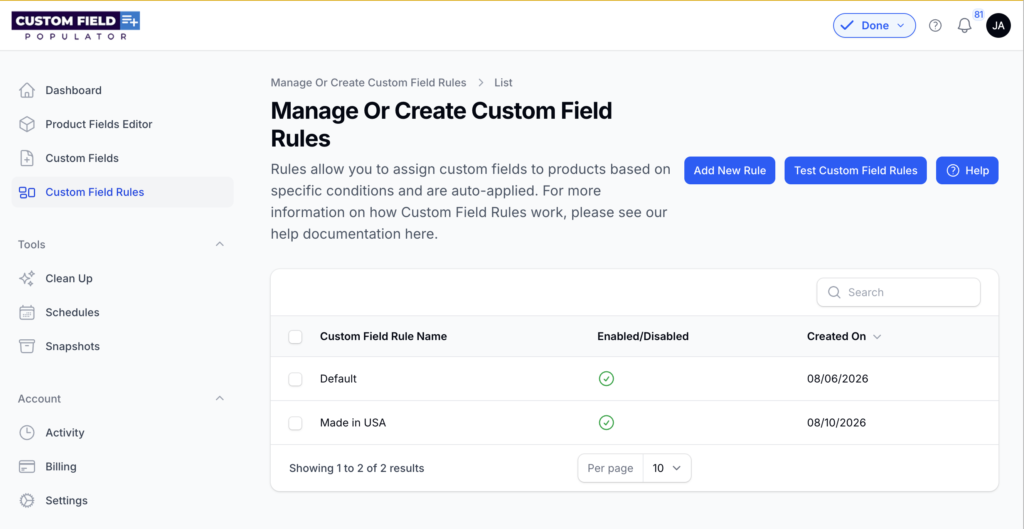
Creating a rule
- Custom Field Rule Name.
- Select Custom Fields to Use With This Rule — the fields this rule applies.
- Apply this rule to — On All Products, or Products Based on Conditions. With conditions, choose Must Meet All Conditions or Must Meet Any Condition and add condition rows (Add condition) using the same fields and operators as the Product Fields Editor’s advanced filters.
- Automatically apply this rule to new products? — if enabled, this rule is applied to new items as they are created.
- Specify Custom Field Value(s) — optionally set rule-specific values for the fields in this rule.
- Apply this rule to all matching products in BigCommerce? — if enabled, the rule is applied to all matching products in your store right away (it runs in the background; watch progress in the Tasks tray).
When rules run
- When a product is created — as long as Automatically Add Custom Fields to New Items is on in Settings, every active rule is evaluated against the new product.
- When you save a rule with “Apply this rule to all matching products” enabled — it back-fills the existing catalog.
- During exports — you can scope an export to products matching a rule.
Testing rules
Test Custom Field Rules (list page) opens a tester: enter a SKU (or turn off Search By SKU to use a BigCommerce Product ID) and it shows exactly which custom fields your rules would put on that product.
Importing custom fields from a CSV
Where: Dashboard → Import from CSV
The import wizard has three steps: Upload → Schedule → Notify.
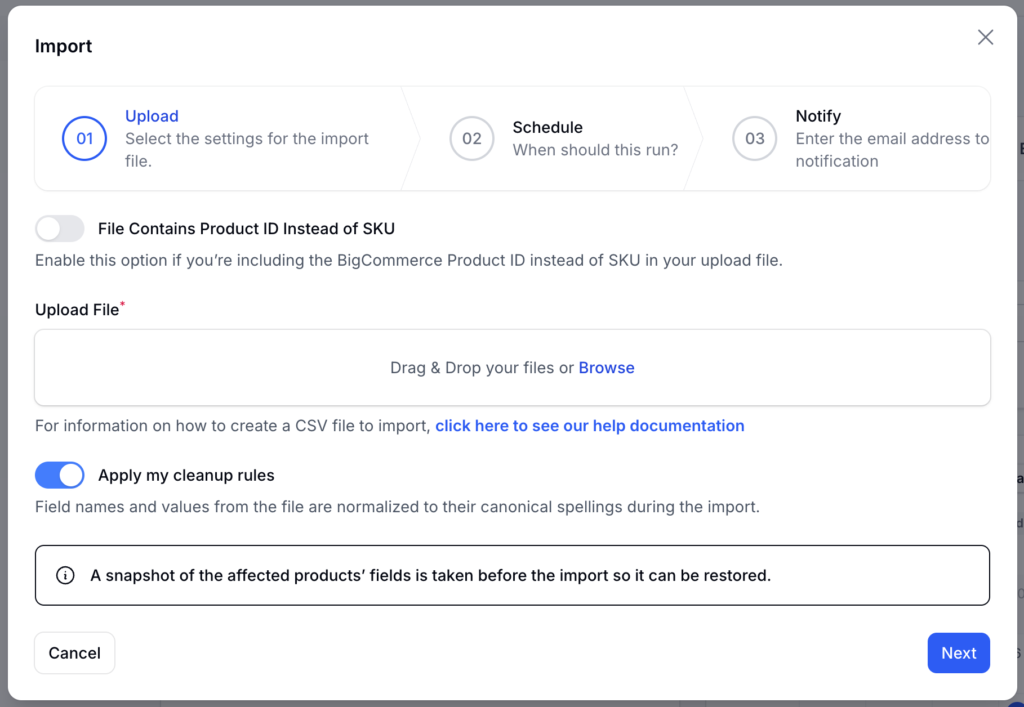
Step 1 — Upload
- File Contains Product ID Instead of SKU — leave off to match products by SKU (the default); turn on if your file’s identifier column holds BigCommerce Product IDs.
- Upload File — your CSV (or tab-delimited TXT). See the format reference below.
- Apply my cleanup rules — shown when you have Clean Up with active rules: field names and values from the file are normalized to their canonical spellings during the import.
- If your plan includes Snapshots, a note confirms that a snapshot of the affected products’ fields is taken before the import so it can be restored.
Step 2 — Schedule
Choose when the import runs:
- Run once, now — import immediately (the default).
- Repeat on a schedule — daily / weekly / monthly; re-runs this file each time. Configure Repeats, Every, days of the week, start date, time, an optional Until date, and the timezone.
- Run once, later — pick a date and time for a one-time run.
- Revert at (optional) — with Snapshots, set a time at which the previous values are restored automatically and the schedule completes. Perfect for temporary changes.
Scheduled options need a free schedule slot on your plan; if you’ve used them all, the options are disabled with a link to upgrade or pause an existing schedule. Scheduled imports appear on the Schedules page, where you can pause, edit, or run them on demand.
Step 3 — Notify
Enter the email address that should receive the completion notice (defaults to your own). When the import finishes you’ll get an email — including a Download Errors link if any rows failed.
Import History
Dashboard → Import History lists imports from the last 7 days with their status. From here you can Download Errors for a problem import, or Re Process it after fixing your store data.
CSV file format reference
The first row of your file must be a header row. Files can be comma-separated (.csv) or tab-delimited (.txt) — the delimiter is detected automatically.
| product identifier | Color | Material |
|---|---|---|
| SKU-001 | Blue | Cotton |
| SKU-002 | Red | |
| SKU-003 | [DELETE] | Wool |
product identifier— required, and must be named exactlyproduct identifier(also accepted:Product IdentifierorPRODUCT IDENTIFIER). It holds each product’s SKU, or its BigCommerce Product ID if you enable the toggle in step 1. SKU matching is case-sensitive.- Every other column is a custom field, with the header as the field name. If a column’s field doesn’t exist yet, the import creates it for you — adding a column is how you add a new field.
- Cell values become that product’s value for the field.
- A blank cell is skipped — it does not blank out an existing value.
- A value of
[DELETE]removes that custom field from the product.
- Duplicate column headers are not allowed — the import stops with an error asking you to combine or remove them. If a field needs multiple values, put them in one column.
- Character encoding is detected and converted automatically, so exports from common spreadsheet tools import cleanly.
Tip: the easiest way to get a correctly formatted file is to run an export first — the export file is the exact import template, edit it and re-upload.
Exporting custom fields
Where: Dashboard → Export Fields
The export wizard has three steps:
1 Select Products
Select Products — leave everything blank to export all products, or narrow by SKU list, keyword, categories, brand, availability, condition, featured, shipping type, stock status, or visibility.
2 Export Settings
Export Settings — choose CSV or TXT (Tab Delimited); optionally export only products matching a Custom Field Rule; and optionally Export Product ID Instead of SKU.
3 Notification
Notification — the email address to send the file to.
The export runs in the background (watch it in the Tasks tray) and the file is emailed to the address you entered, with a Download button. The file’s first column is product identifier followed by one column per active custom field — ready to edit and re-import.
Clean Up
Where: sidebar → Tools → Clean Up
Premium feature. Clean Up finds and fixes duplicate custom fields, case mismatches like “Color” vs “color”, merges fields together, and sets up rules so new products always come out right. On the Basic plan the page shows what a scan would fix in your store, with the fix buttons locked behind Unlock Clean Up.
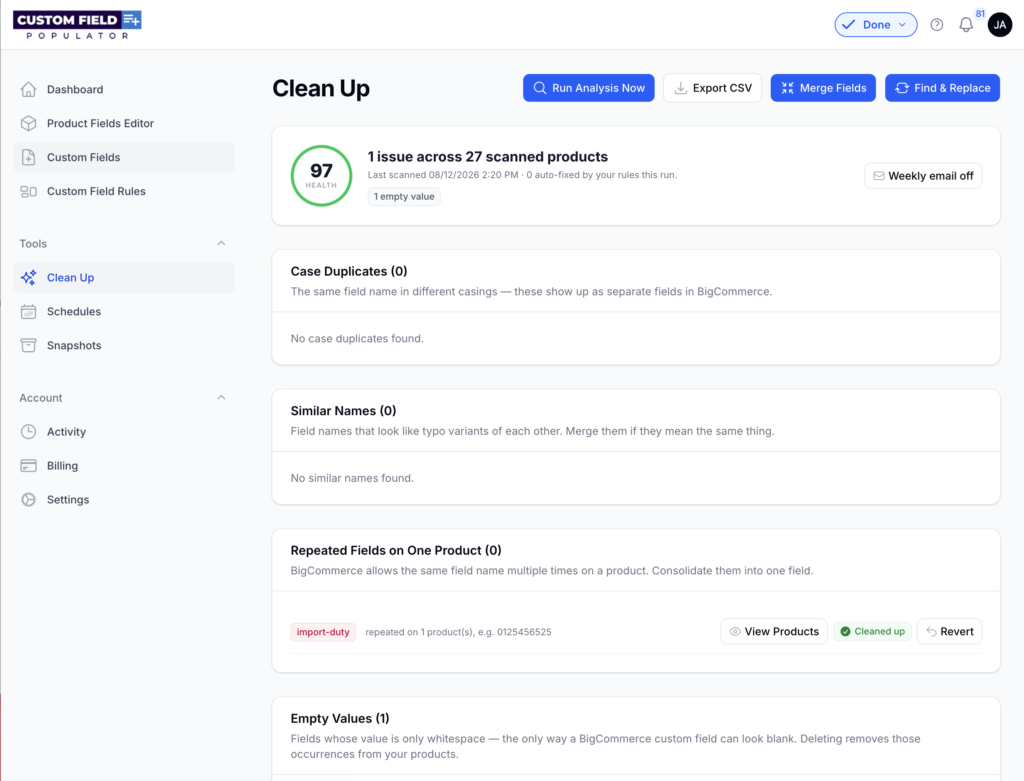
Health score and scanning
Click Run Analysis Now to scan your catalog (a weekly scan also runs automatically). The header shows a Health score ring — it improves as you resolve findings — along with when the store was last scanned and how many issues your cleanup rules auto-fixed on that run. Export CSV downloads the full report.
The four finding types
- Case Duplicates — the same field name in different casings; these show up as separate fields in BigCommerce. Fix with Merge or Rename All.
- Similar Names — field names that look like typo variants of each other. Merge them if they mean the same thing.
- Repeated Fields on One Product — BigCommerce allows the same field name multiple times on a product. Consolidate them into one field, keeping the first value or combining values with a delimiter.
- Empty Values — fields whose value is only whitespace, the only way a BigCommerce custom field can look blank. Delete Empty Values removes those occurrences from your products.
Every finding also offers:
- View Products — a list of the exact products and values affected, with its own CSV export.
- Create Rule — turn the fix into a cleanup rule so it can’t come back.
- Ignore — hide the finding from counts and future scans until you Unignore it.
When you apply a fix from Merge or Rename All, you can tick “Also create a rule so this is fixed automatically next time.”
A snapshot is taken before every fix, then the changes run in the background. If a previously cleaned issue reappears, its row is marked Cleaned up — recurred.
Merging any two fields
Merge Fields (top of the page) lets you combine any fields into one — they do not need similar names. Pick the fields, choose which name to keep, and decide what happens when a product has multiple values (keep the winning field’s value, or combine values with a delimiter).
Find & Replace
Premium feature (included with Premium alongside Clean Up).
Find & Replace Values replaces values on every product’s occurrence of a field. Choose the field, whether to match Value equals or Value contains, then enter Find and Replace with. A snapshot is taken first.
Undoing a cleanup
Each completed fix keeps a Revert button that restores the snapshot taken before the cleanup ran. The Previously Cleaned Up section lists fixes from earlier scans too, so you can revert those as well — until their snapshot expires (see Snapshots for retention).
Cleanup Rules
The Cleanup Rules table at the bottom of the page holds your normalization rules. They’re applied automatically on every scan and import — so new products come out correct. Each rule has:
- Match — Field name equals (any casing) or Field name matches pattern (\* wildcard).
- Field name / pattern — e.g.
colororcolo*. - Correct to — the canonical name, e.g.
Color. - Value corrections (optional) — pairs of “When the value is → Change it to”.
- An Active toggle.
Rules also run when BigCommerce sends new products through your webhooks and during scheduled imports (via each import’s Apply my cleanup rules toggle).
Weekly Health Report email
Premium feature.
Click Weekly email off / Weekly email on at the top of the Clean Up page to toggle the report. When enabled, every Monday you’ll receive “Custom Field Health Report” — how many products and fields were scanned, what’s new since the last report, what your rules auto-fixed, and a CSV listing every issue with the products it affects.
Schedules
Where: sidebar → Tools → Schedules
Schedules run custom field work for you on a timetable: recurring CSV imports from a feed, or one-off rule-based updates — ideal for sales, seasonal content, and supplier feeds.
Your plan sets how many schedules can be active at once (Basic: 1, Premium: 50). The count under the page title shows your usage — e.g. “2 of 50 active.” At the limit, the create button disappears until you pause or delete a schedule, or upgrade.
The list
- Status tabs: All / Active / Paused / Failed.
- Next 7 days tab: a timeline of every upcoming run and auto-revert, grouped by day.
- Row actions: Run Now (queue an immediate run), Pause, Resume, Edit, Delete. Resuming checks your schedule limit first.
Creating a schedule
Click New schedule and choose a Type (this can’t be changed later):
Scheduled Import — re-runs an import on a schedule.
- Source: an Uploaded file (re-run each time), a Remote URL (a publicly reachable CSV, fetched fresh each run), or a Google Sheet (paste the sheet link; the sheet must be shared as “Anyone with the link”).
- Match products by SKU or Product ID.
- Apply my cleanup rules — same normalization as the import wizard (shown when you have Clean Up with active rules).
- Repeats: Once, Daily, Weekly (pick the days), or Monthly, with a start date, time, optional end date, and timezone (defaults to your store’s timezone).
Rule-Based Update — a one-time update that sets field values on matching products.
- Which Products: all products, or only products matching rule conditions (the same condition builder as advanced filters).
- Field Values: the name/value pairs to set on matching products when the schedule runs.
Revert at (optional) — available with Snapshots: a snapshot of the affected products’ fields is taken before each run, and at this time the previous values are restored automatically. Perfect for sales and holidays — set the price badge on Friday, have it removed Monday morning, automatically.
Snapshots
Where: sidebar → Tools → Snapshots
Snapshots are point-in-time backups of your products’ custom fields. The app takes them automatically before every risky operation — CSV imports, scheduled updates, field merges and renames, Find & Replace, and cleanups — and you can take one manually any time.
Your plan sets how many manual snapshots you can keep (Basic: 3, Premium: 50). Automatic snapshots don’t use your manual slots. Your plan also sets how far back your snapshot history goes — 7 days on Basic, 30 days on Premium; older snapshots drop off the list (the page notes your history window under the title). Snapshots are permanently deleted after 90 days.
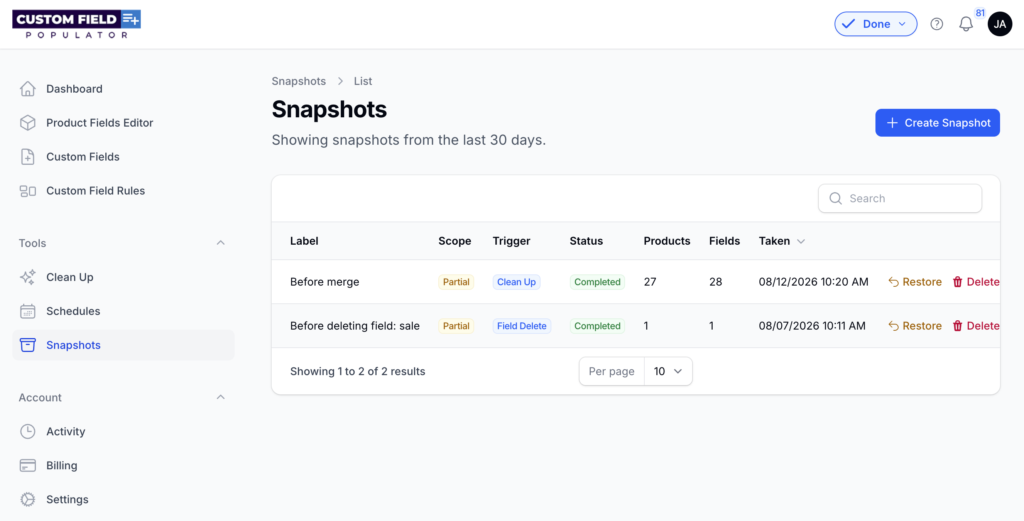
The list
Each snapshot shows:
- Label — auto-generated (e.g. “Manual — Aug 4, 2026 3:07 PM”) or the label you typed.
- Scope — Full catalog, or Partial when it covers only certain products or fields (hover to see which fields).
- Trigger — Manual, Field Merge, Field Rename, Scheduled Update, Find & Replace, Clean Up, or CSV Import.
- Status, Products, Fields, and when it was Taken.
Taking a snapshot
Click Create Snapshot, optionally give it a label (e.g. “Before spring cleanup”), and the full catalog is backed up in the background. You can also snapshot just the products you’ve selected from the Product Fields Editor via Take snapshot first.
Restoring
Click Restore on a snapshot and read the confirmation carefully — it tells you exactly what will happen:
- A full catalog snapshot overwrites the current custom field values on every product in the snapshot.
- A partial snapshot only touches the products it contains; everything else is left alone.
- A field-scoped snapshot restores only those fields — including removing them from products where they didn’t exist when the snapshot was taken.
Restores cannot be undone unless you take another snapshot first. The restore runs in the background; watch it in the Tasks tray.
Activity & background tasks
Activity
Where: sidebar → Account → Activity
A complete, store-scoped log of everything that happens in the app: imports, exports, field changes, cleanups, schedule runs, snapshot restores, billing changes, and more. Each entry shows When, Type, Description, Status (with live progress for running jobs), and the User who did it. Filter by Type to find what you’re looking for.
The Tasks tray
The Tasks pill in the top bar keeps you informed about background work without refreshing:
- While jobs run, the pill shows a live progress ring and the task count; open it to see each task’s progress bar.
- ✕ Cancel stops a running task (changes already applied are not undone).
- Completed tasks stay listed for 24 hours — Dismiss individual rows or Clear completed.
- View history jumps to the Activity page.
Billing & plans
Billing Info
Where: sidebar → Account → Billing
- Current Plan — your plan and price, with a Change Plan button that opens Compare Plans. If a downgrade is pending, a banner shows when it takes effect with a Cancel downgrade link.
- Credit Card Info — the card on file (last 4 digits and expiration). Update Card / Add Card opens a secure payment form.
- Billing Info — your billing name and address; click Edit to update.
- Billing History — past charges, each with a Resend Receipt action.
To cancel your subscription (or trial), uninstall the app from your BigCommerce store.
Compare Plans
Where: Billing → Change Plan (also linked from upgrade prompts around the app)
A side-by-side matrix of Basic and Premium — every feature with its limits, and your current plan marked.
Upgrading. Click Upgrade. Your plan changes immediately — Premium features unlock right away. If you’re mid-trial, your remaining trial days carry over and your first charge lands when the trial ends; otherwise the next charge date is shown before you confirm. You can pay with the card on file or Use a different card.
Downgrading. Click Downgrade. The downgrade is scheduled for the end of your current billing period — you keep your current plan until then. Before confirming, the app lists exactly what changes with real numbers from your store, for example:
- “You have 12 active schedules; Basic allows 1. The rest will stop running.”
- “You have 8 snapshots; Basic keeps 3. Older snapshots become unavailable, and your snapshot history shortens from 30 days to 7.”
- “You will lose access to Custom Field Clean Up.”
Nothing is deleted — if you upgrade again later, everything comes back. You can Cancel downgrade any time before it takes effect, from either the Compare Plans or Billing page.
Settings
Where: sidebar → Account → Settings
Automatically Add Custom Fields to New Items. When this option is enabled, Custom Field Populator will automatically add all custom fields to new items when they are created (and evaluate your Custom Field Rules against them). Disabling will not remove custom fields from existing items.
Set a Global Default Value for All Custom Fields. Enabling lets you specify a default value (such as “on”) applied to every custom field. Most merchants do not need a global value — only enable it if you want one set value across all custom fields.
Store Timezone. Dates and times across the app are shown in this timezone. It was detected from your BigCommerce store settings and can be corrected here. It’s also the default timezone for new schedules.