Back in Stock Wizard for BigCommerce helps store owners turn out-of-stock product pages from dead ends into future sales opportunities. Instead of shoppers landing on a sold-out product, shrugging, and wandering off to buy from a competitor, the app adds a simple “notify me” form to out-of-stock product pages so customers can sign up for an alert when the item is available again. Once inventory is replenished, Back in Stock Wizard can send automated restock notification emails, helping merchants bring interested shoppers back at the exact moment they are most likely to buy.
For eCommerce store owners, the big win is that it solves one of the most frustrating problems in online retail: losing sales simply because an item was temporarily unavailable. It also gives merchants valuable insight into demand, showing which products customers are actively waiting for so they can make smarter restocking decisions. With customizable email templates, storefront form controls, subscriber tracking, product activity reports, and optional features like daily reports and custom sending domains, Back in Stock Wizard is more than just a notification tool. It is a simple way to recover missed revenue, improve the customer experience, and make inventory decisions based on real shopper interest.
This support document is for Back In Stock Wizard version 2.0 released in June 2026. Version 1.0 has been deprecated and users are being migrated over to version 2.0.
This document is also available to download as a PDF by clicking here.
Have a question? Need help setting up Back in Stock Wizard? No problem! Use the Contact Form or email us directly at help@yourstorewizards.com and we’ll be happy to assist.
Initial Setup
After completing the required onboarding, you will see a setup checklist that walks you through configuring your store. These steps are optional but recommended:
- Email Template — Customize the look and feel of the “back in stock” notification emails sent to your subscribers.
- Subscription Form — Customize how the subscription form appears on your product pages.
- Mail Settings — Set up a custom email domain so notifications are sent from your own domain instead of a generic one.
- Enable Back in Stock Form — Turn on the subscription widget on your storefront so customers can sign up for notifications.

You can complete these steps in any order and return to them at any time.
Enabling / Disabling Back in Stock Wizard
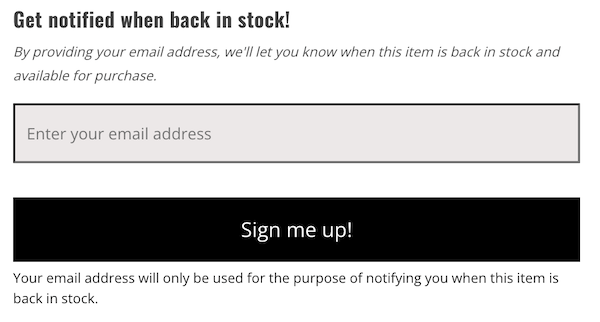
The Back in Stock widget is a small form that appears on your product pages when a product is out of stock. It allows customers to enter their email address to be notified when the product is back in stock.
The widget toggle button is located in the top navigation bar of your dashboard.

Single Storefront
If your store has a single storefront, the toggle works as a simple on/off button:
- Enable Back in Stock Form — Click to install the widget on your storefront. The button turns green with a bolt icon.
- Disable Back in Stock Form — Click to remove the widget. The button turns red with an X icon.
When enabled:
- A “Notify Me” form appears on out-of-stock product pages
- Customers can enter their email to subscribe to restock notifications
- Subscriptions are automatically tracked in your Subscribers list
When disabled, the subscription form will no longer appear on your product pages, but existing subscriptions are preserved.
Multi-Storefront
If your BigCommerce store has Multi-Storefront enabled, you can manage the widget independently for each storefront. The toggle button shows Manage Back In Stock Form with a badge showing how many storefronts have the widget enabled (e.g., 1/3).
Clicking the button opens a modal listing all of your storefronts. From here you can:
- Enable or disable individual storefronts — Each storefront has its own Enable/Disable button.
- Enable All — Installs the widget on all storefronts at once.
- Disable All — Removes the widget from all storefronts at once.
The badge color indicates the current state:
- Green — All storefronts enabled
- Yellow — Some storefronts enabled (partial)
- Gray — No storefronts enabled
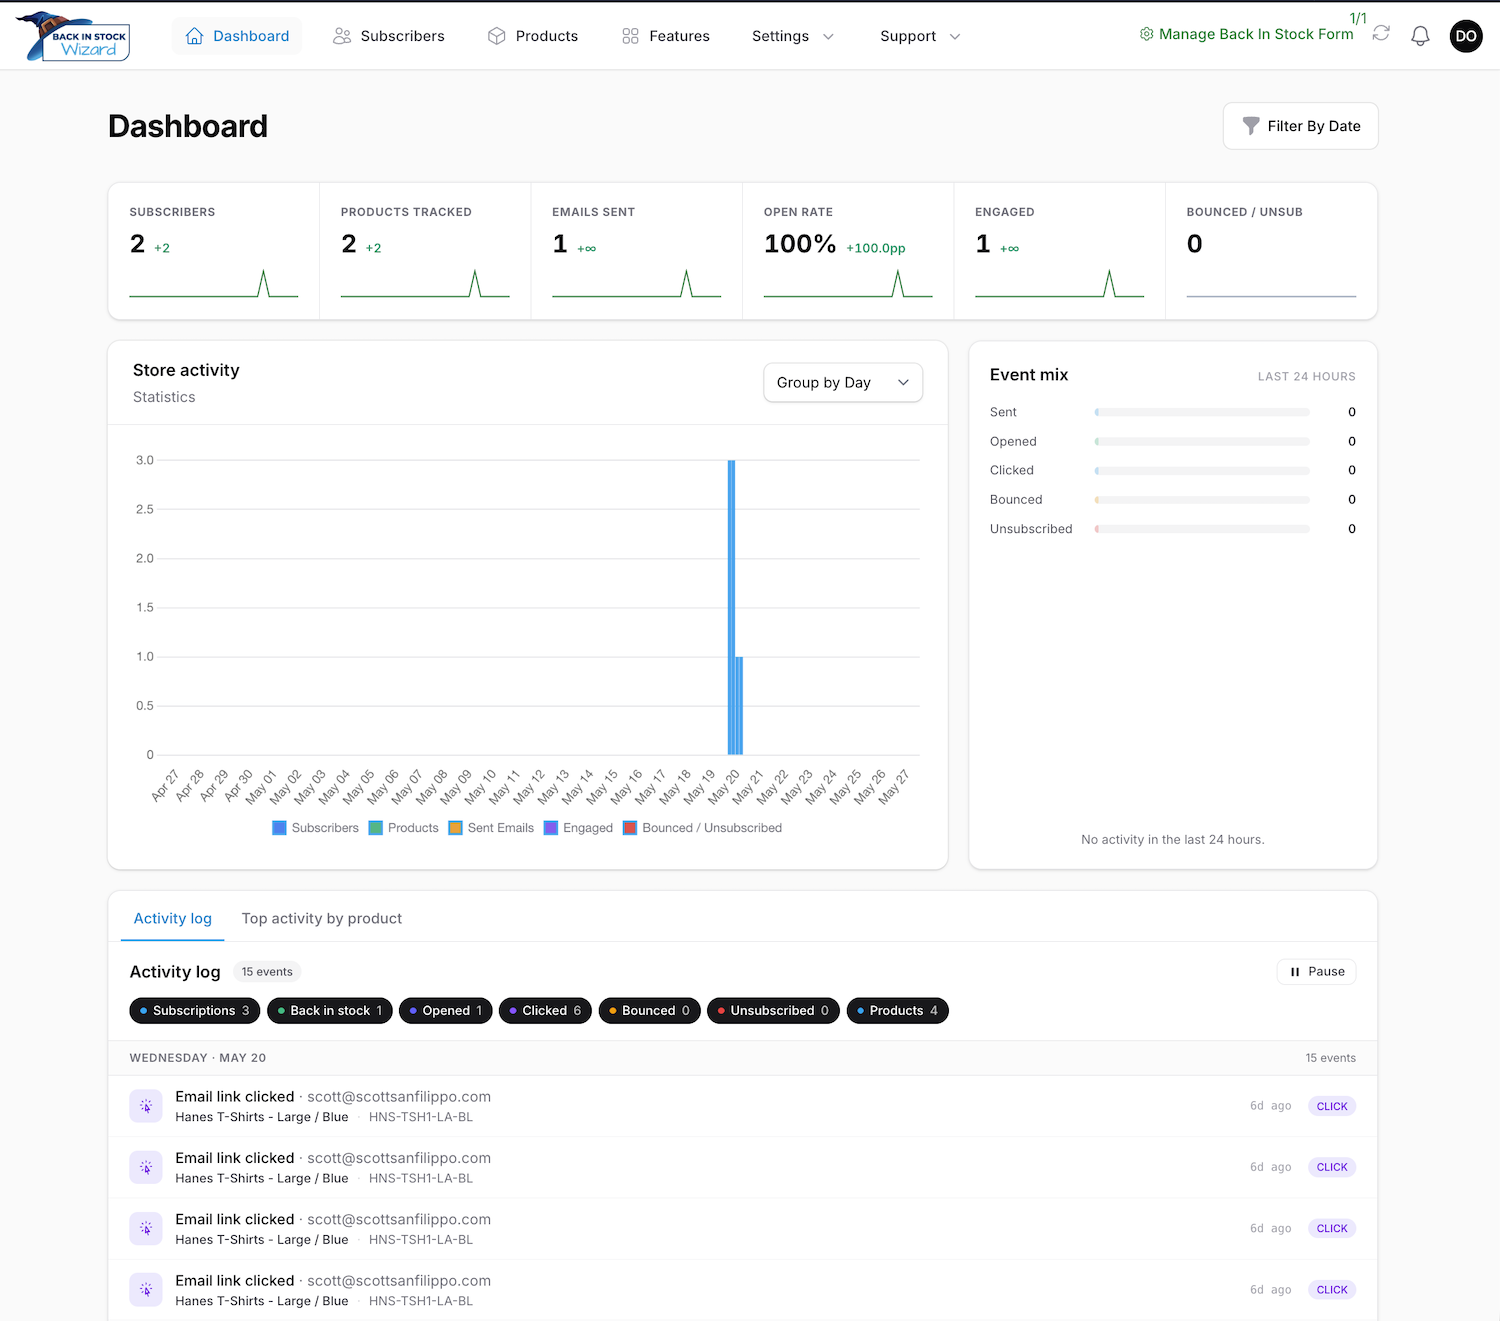
Back In Stock Wizard Dashboard Overview
The Dashboard is your home page and provides an at-a-glance command center for your store’s subscription activity.
Setup Track
If you have not yet completed the initial setup checklist, a horizontal stepper appears at the top of the Dashboard. Each step shows its status (current, completed, or skipped), and the current step has an action button you can click to jump straight to that screen. You can also Skip a step if it does not apply.
The stepper disappears once all steps are completed or skipped.
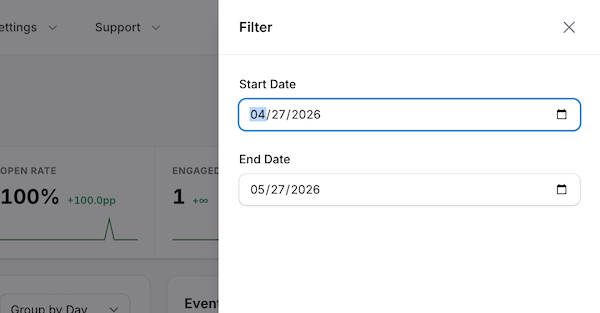
Date Range Filter
Use the Start Date and End Date fields at the top to filter dashboard data to a specific time period. By default, the dashboard shows the last 30 days.
KPI Tiles
A row of six tiles showing your most important metrics for the selected date range. Each tile displays the current value, the change versus the prior period, and a sparkline trend.

- Subscribers — Total subscribers, with new sign-ups this period
- Products Tracked — Products with subscriptions, with new ones this period
- Emails Sent — Restock notifications sent this period
- Open Rate — Percentage of sent emails that were opened
- Engaged — Subscribers who opened or clicked an email
- Bounced / Unsub — Bounces, email-link unsubscribes, and storefront unsubscribes
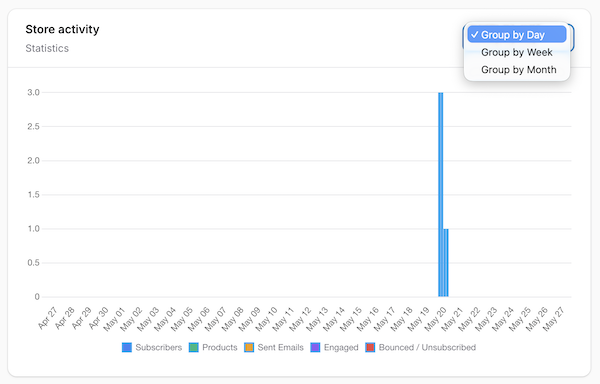
Daily Activity
A bar chart on the left showing activity trends over the selected date range.
- New Subscribers — How many people signed up
- Products with Activity — Products that had new subscriptions
- Sent Emails — Restock notifications sent
- Engaged — Opens and clicks
- Bounced/Unsubscribed — Failed deliveries and opt-outs
Use the filter dropdown to group data by Day, Week, or Month.
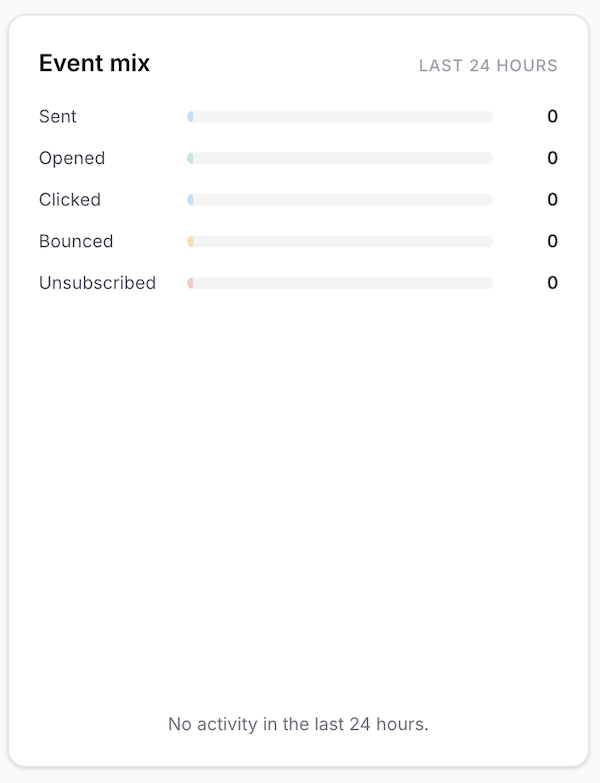
Event Mix (last 24 hours)
A compact sidebar to the right of the Daily Activity chart that breaks down the last 24 hours of activity by event type, so you can see at a glance what is happening right now without changing the dashboard date range.
Activity Panel
A tabbed panel at the bottom of the dashboard:
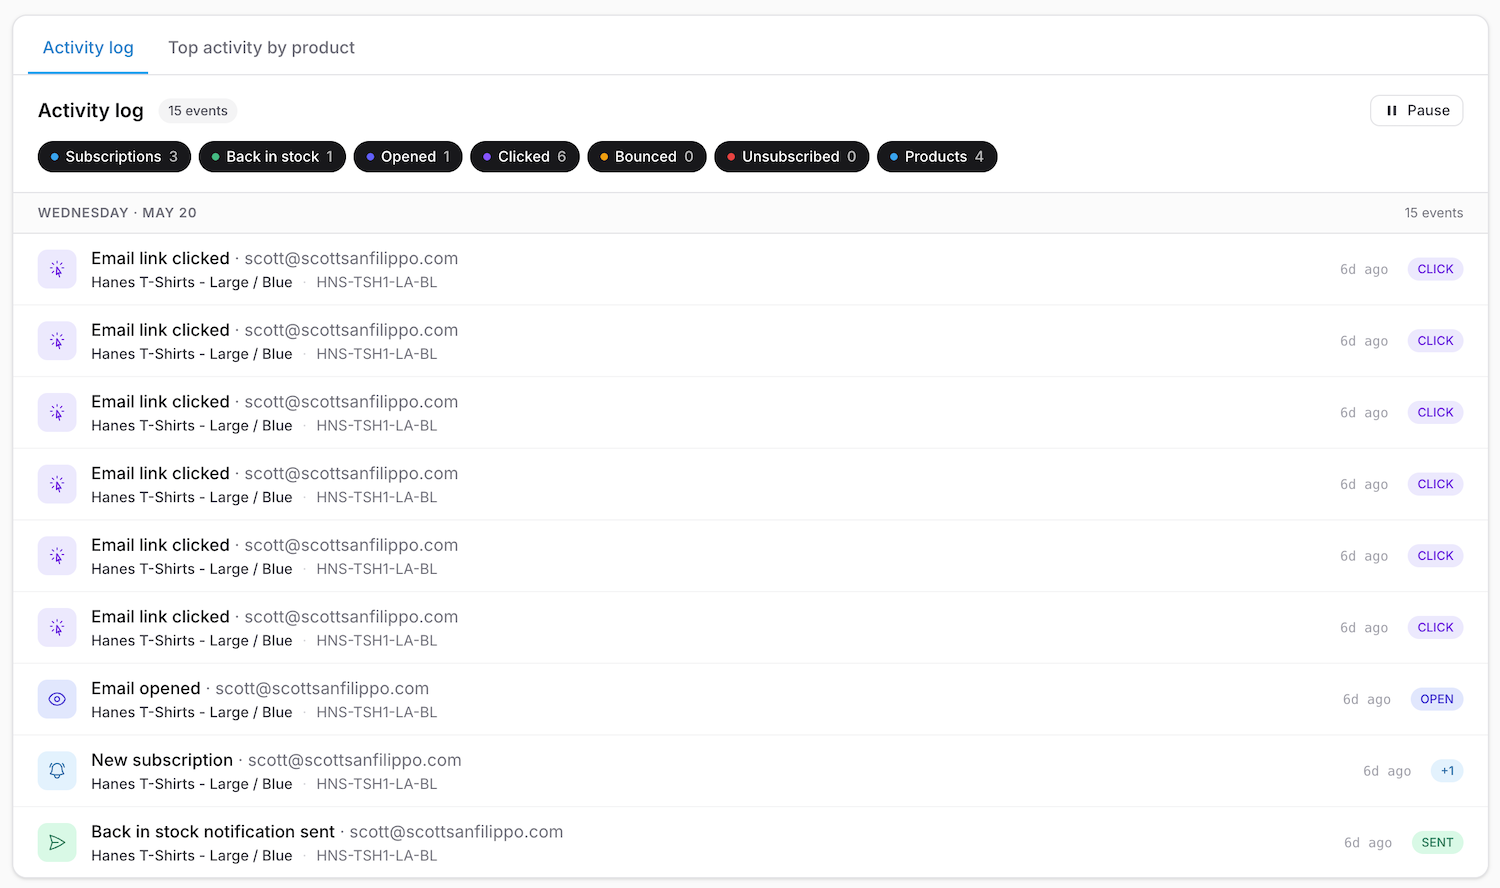
Activity Log
A live, day-grouped feed of everything happening in your store. Each entry shows the event type, the product (when applicable), the subscriber email, and a relative timestamp. Use the filter chips at the top to narrow the feed to one or more event types:
- Subscriptions — New sign-ups (including any imported from history)
- Back in stock — Restock notification emails sent
- Opened — Subscribers who opened a notification
- Clicked — Subscribers who clicked a link in a notification
- Bounced — Notifications that failed to deliver
- Unsubscribed — Subscribers who opted out (from an email link or from the storefront)
- Products — New products that started receiving subscriptions
Top Activity by Product
A table showing the products driving the most activity. Columns:
- Product — Name and SKU
- Subs — Active subscribers
- Sent — Notification emails sent
- Opens% — Percentage of those emails that were opened
- Clicks — Click count
- Last event — When the most recent activity occurred

Viewing Your Profile
Access your profile by clicking your name in the top-right corner and selecting Profile.
By clicking on your name, you can update:
- Name — Your first and last name
- Email — Your login email address

- Timezone — Used for displaying dates and scheduling reports
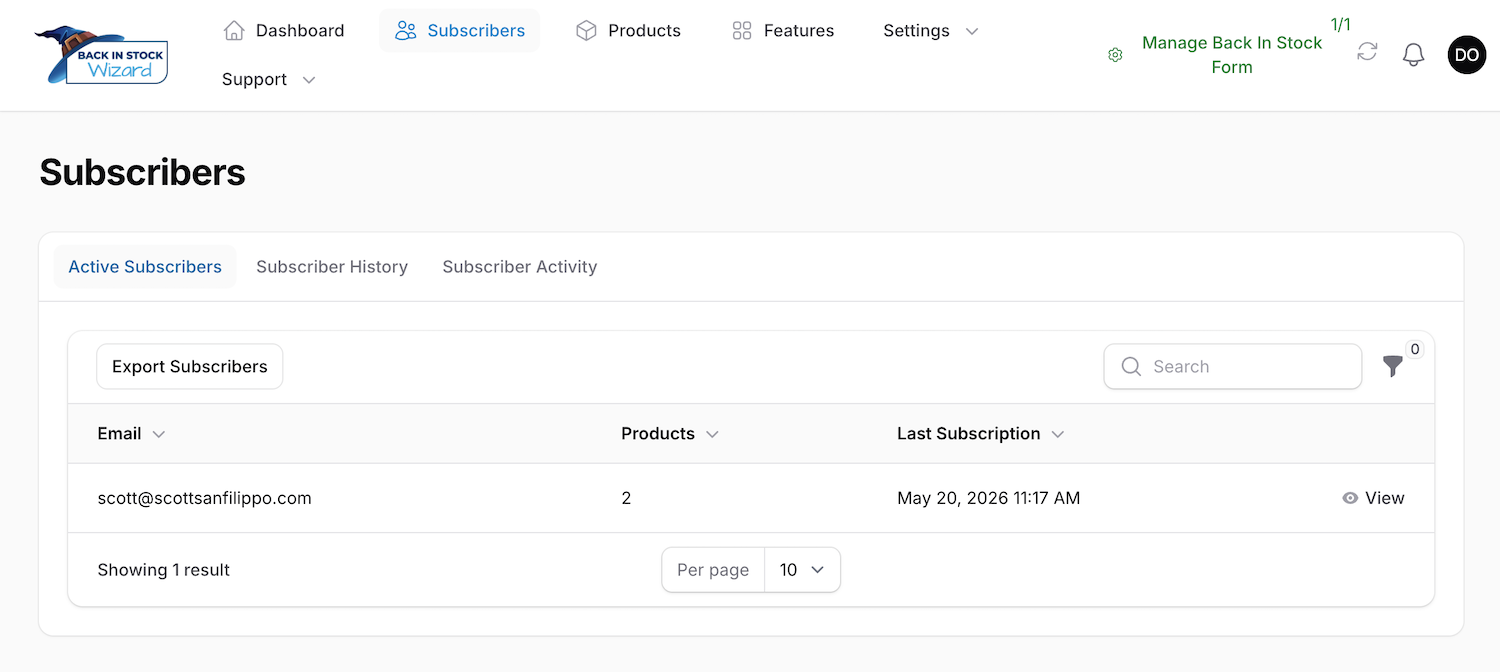
Subscribers Page
The Subscribers page gives you a complete view of everyone who has signed up for restock notifications. It is organized into three tabs:
Active Subscribers
Shows all currently active subscriptions — people waiting to be notified when a product comes back in stock. You can see the subscriber’s email, the product they are watching, and when they subscribed.
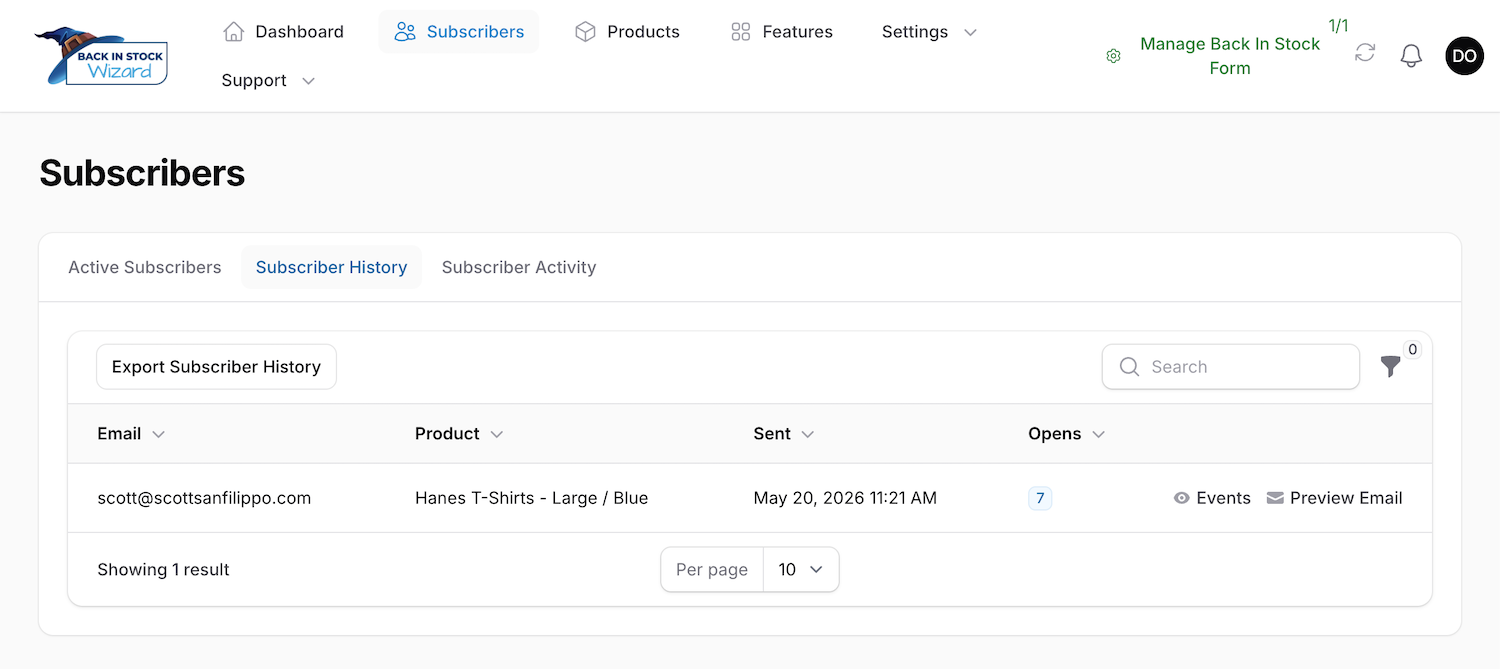
Subscriber History
Shows the full history of all subscriptions, including those that have already been notified, expired, or unsubscribed. This is useful for tracking engagement over time.
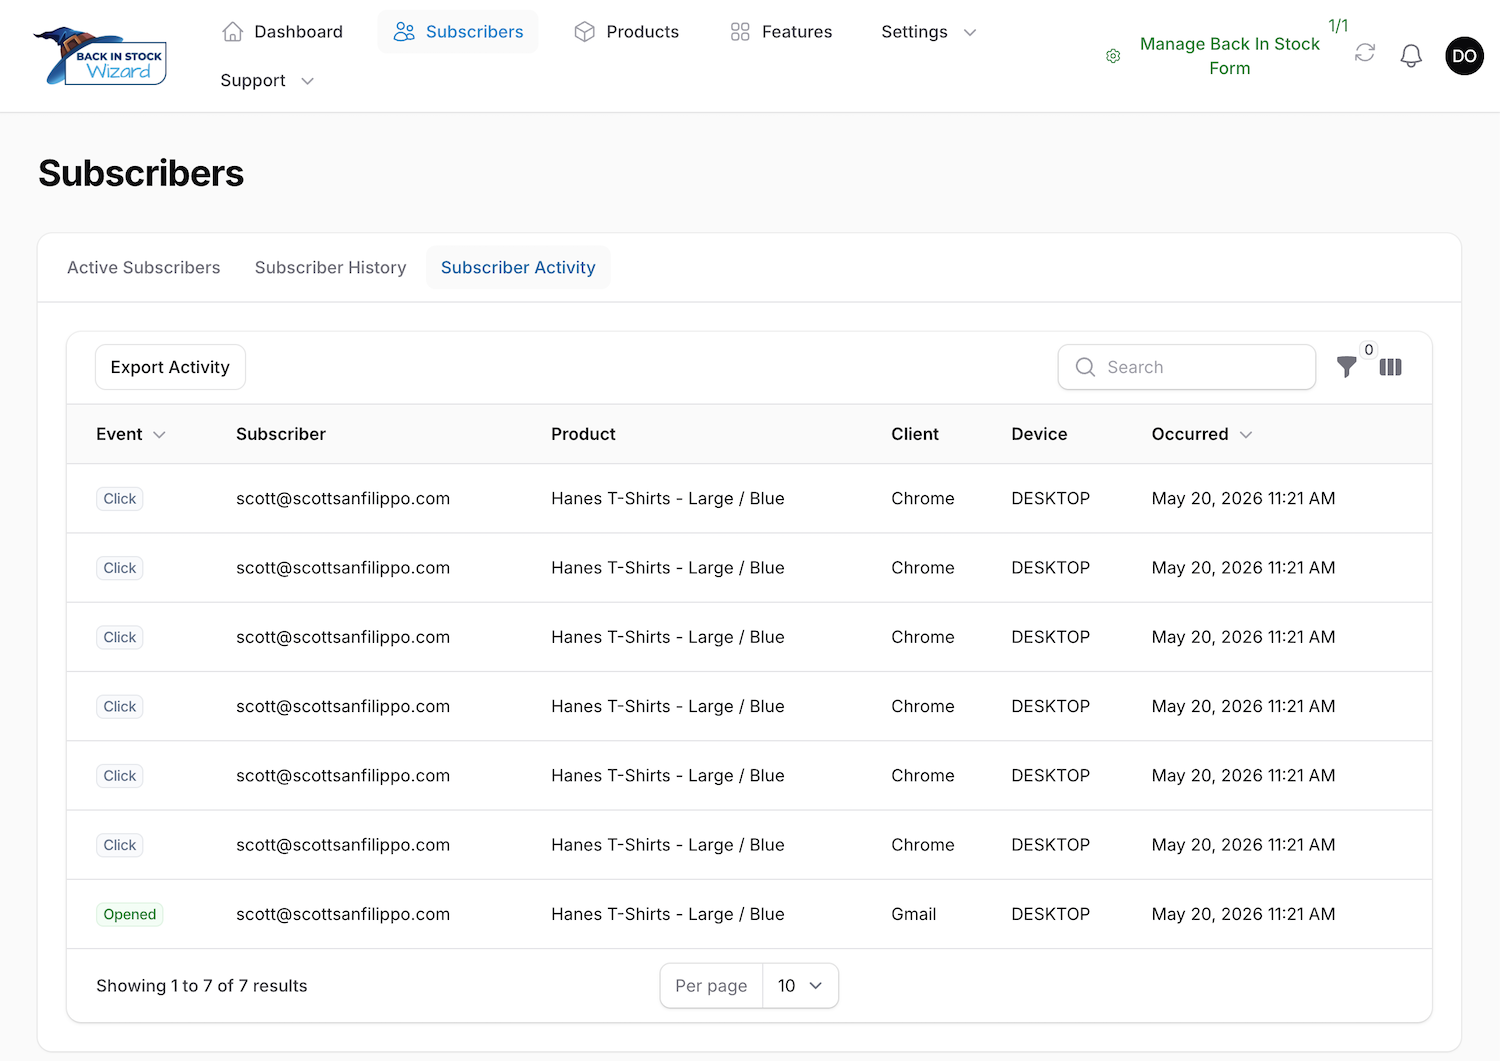
Subscriber Activity
Shows a log of events related to your subscribers, such as:
- When a notification email was sent
- When a subscriber opened or clicked an email
- When a subscriber unsubscribed or an email bounced
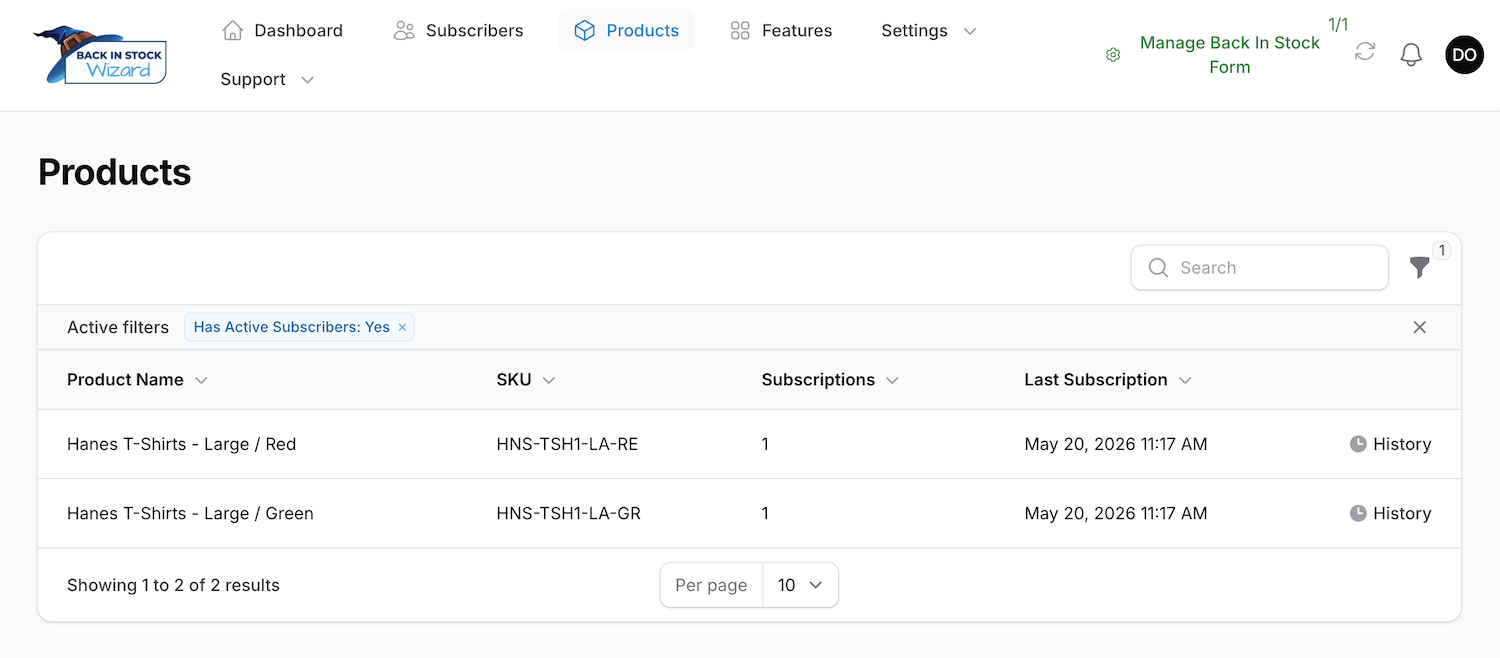
Products Page
The Products page shows all products in your store that have active or historical subscription activity. For each product, you can see:
- Product name and SKU
- Number of active subscriptions
- Subscription history
Use this page to identify which products are most in-demand and prioritize restocking accordingly.
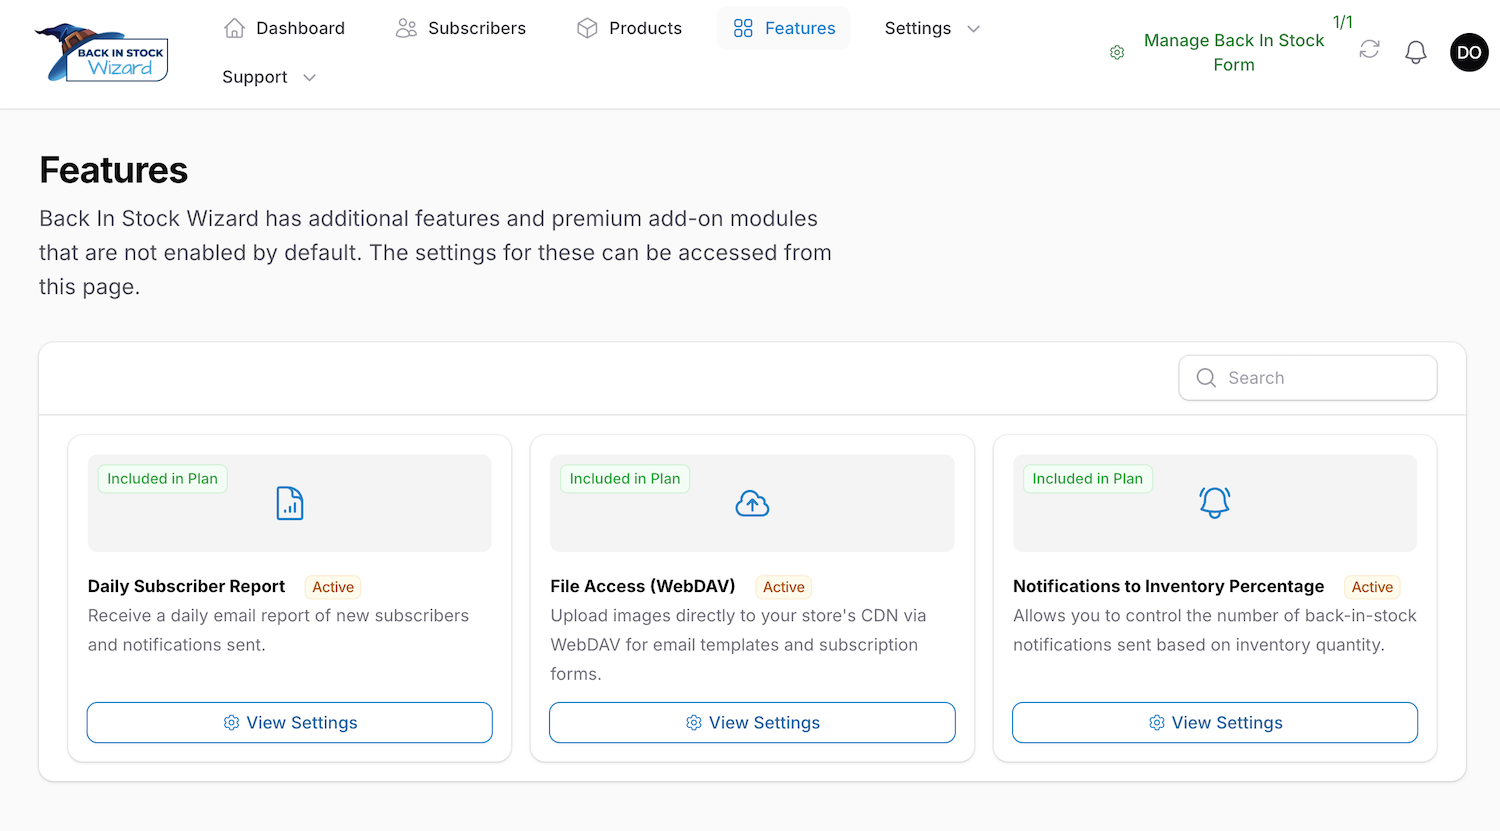
Features Page
The Features page shows additional capabilities and premium add-on modules available for your store.
Each feature displays:
- Name and description of what it does
- Whether it is included in your plan (free) or a premium add-on
- Pricing for premium features
- An enable/disable toggle to turn features on or off
Simply toggle a feature on to activate it, or off to deactivate it. Some features may require additional configuration after enabling — you will be guided through any necessary setup.
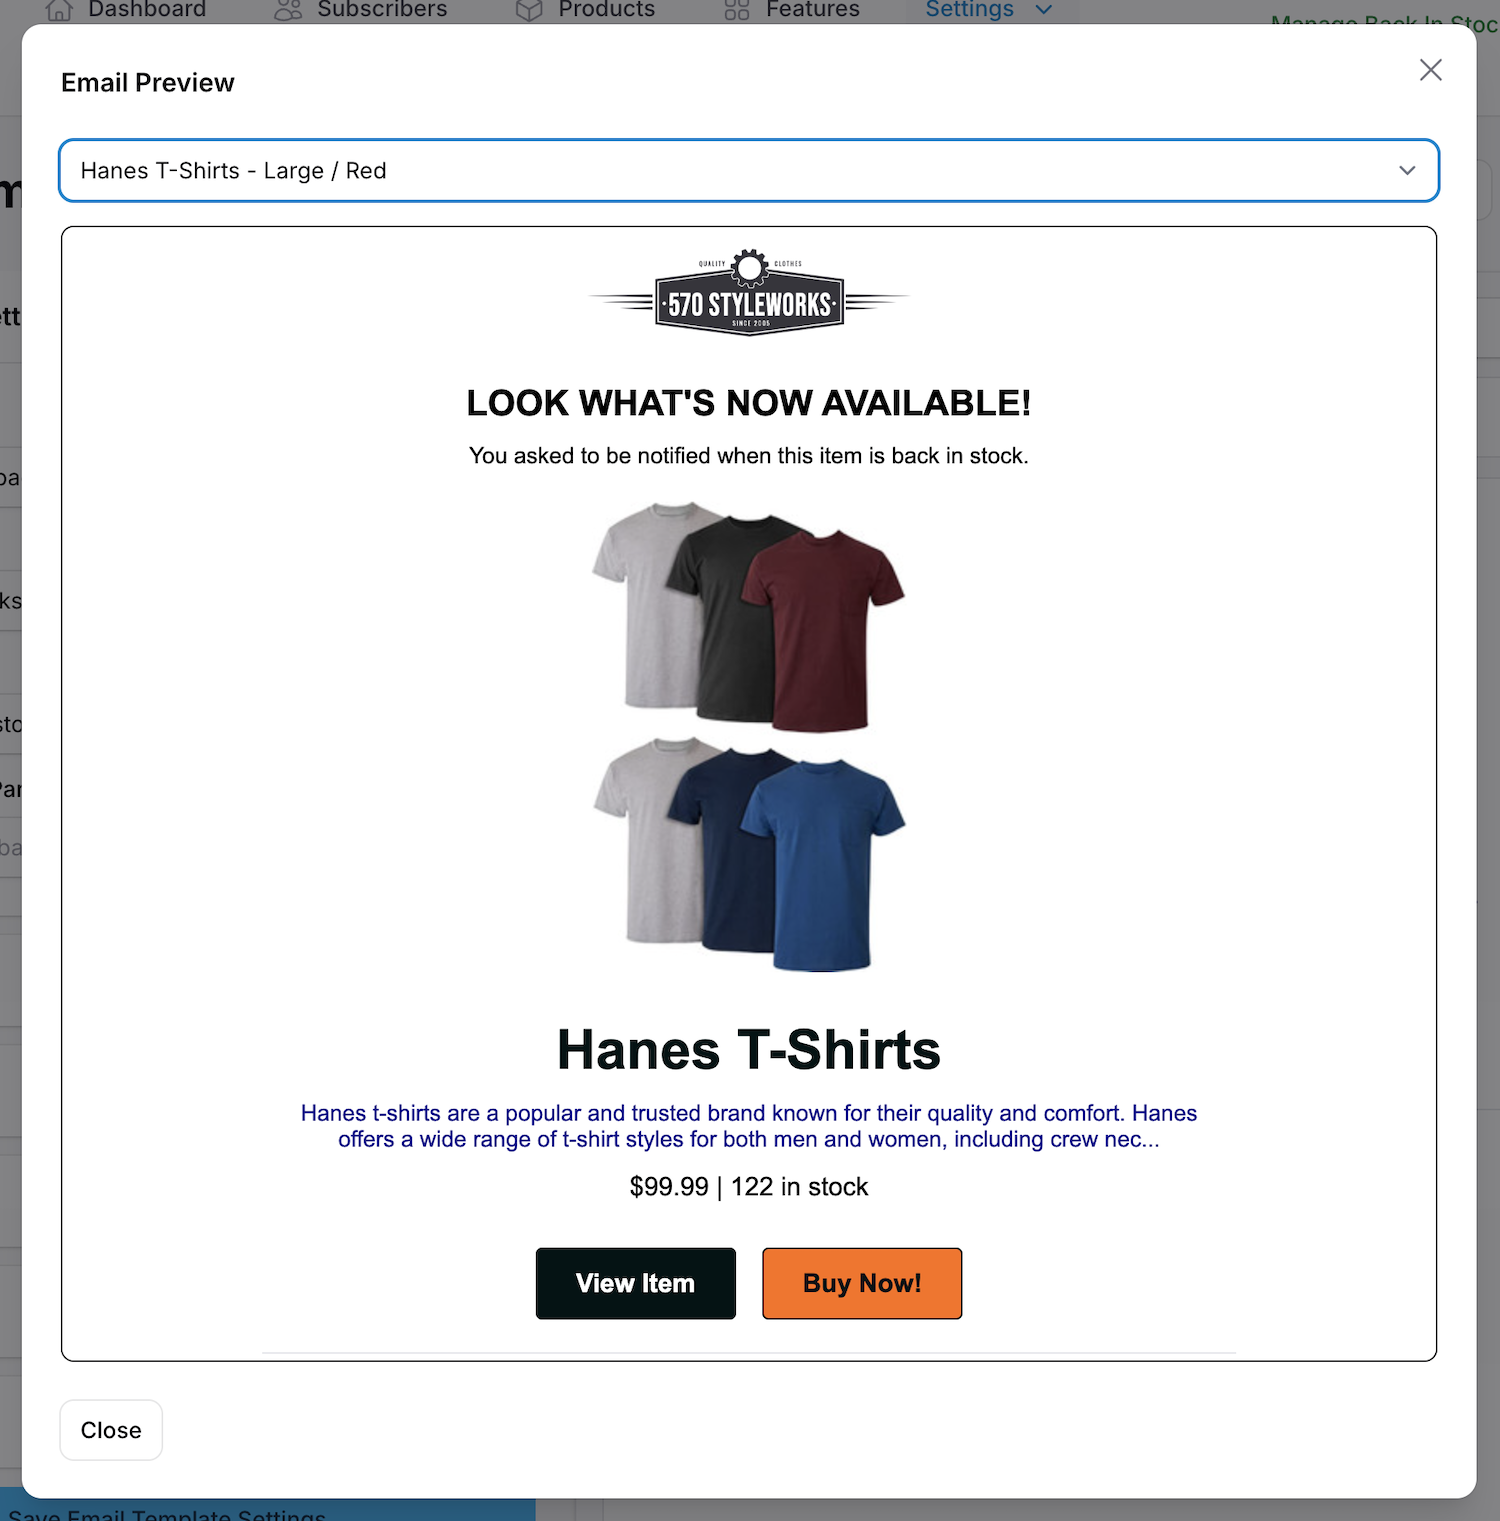
Customizing Your Email Template
Customize the notification emails that are sent to subscribers when a product comes back in stock. The page has a live preview on the right that updates as you make changes. Use the preview’s product dropdown to render the email with one of your own products (defaults to sample data). Two header actions are also available: Final Preview (full-size modal) and Send Test (delivers a real test email to an address you choose).
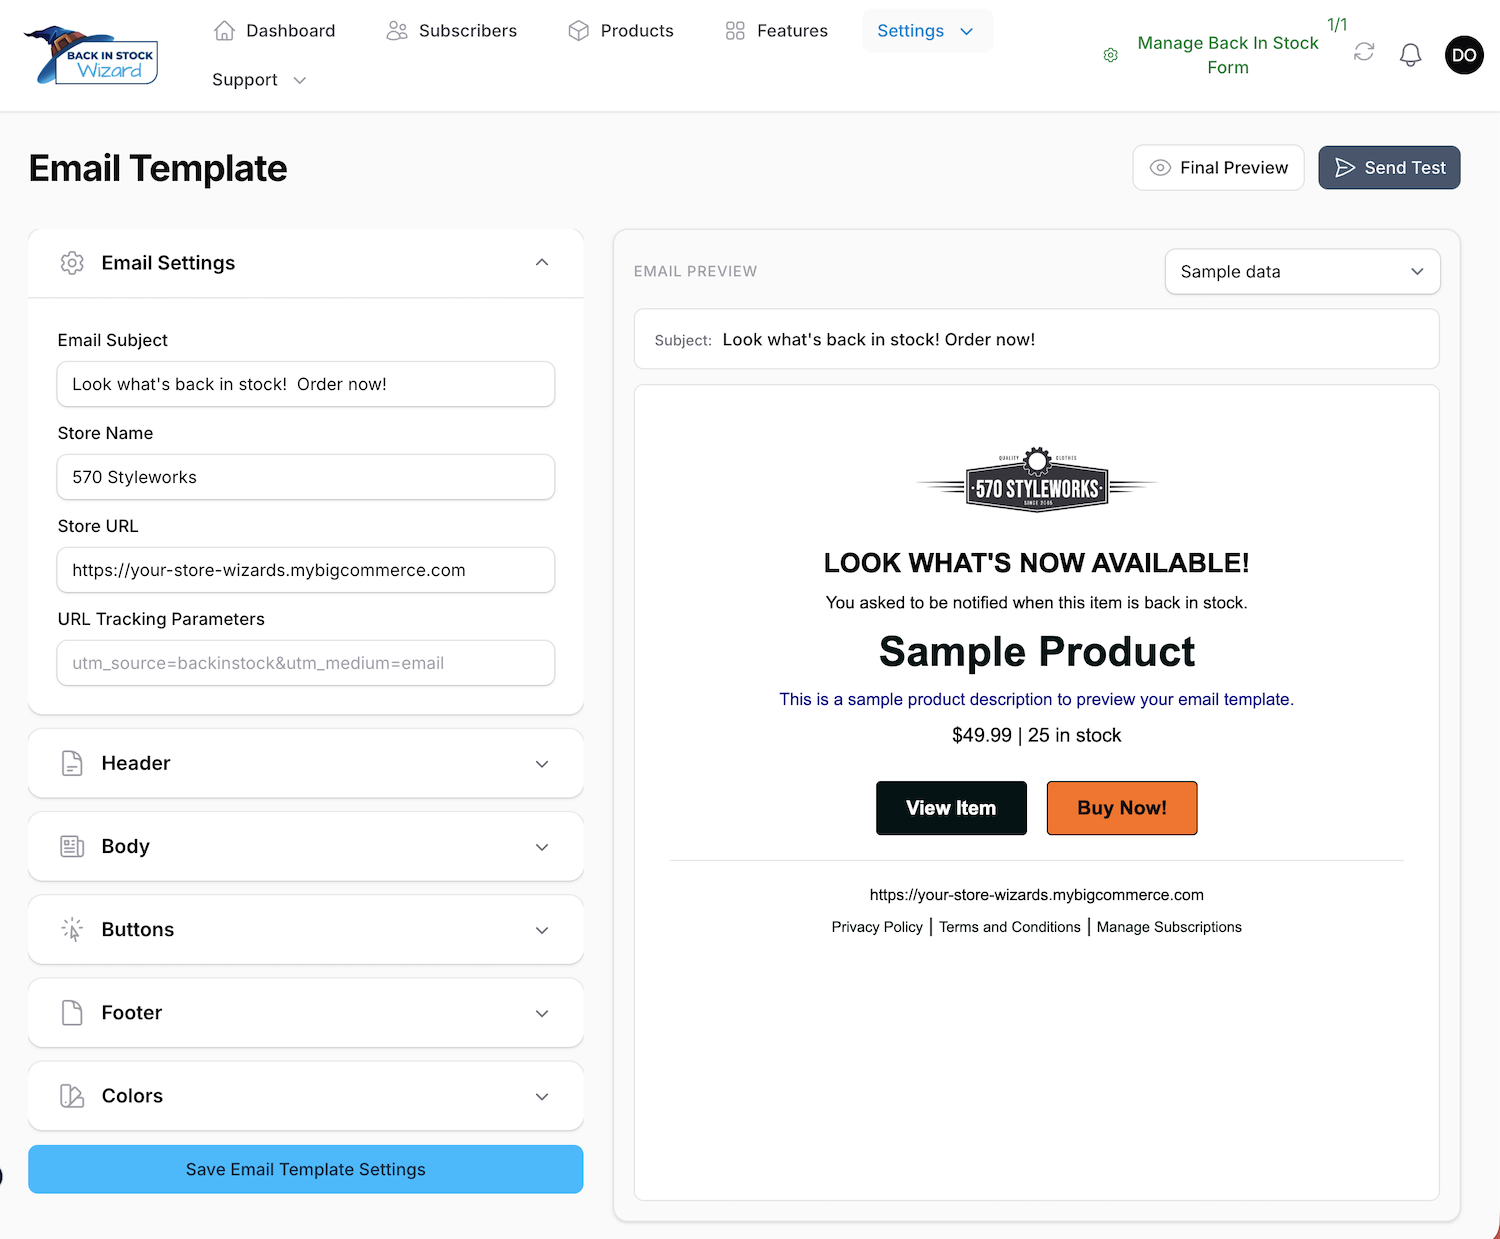
What you can customize:
- Email Settings — Subject line, store name displayed in the email, store URL, and optional URL tracking parameters
- Header — Welcome text, logo upload, and toggles to show/hide each
- Body — Subtitle (rich text with its own color controls), product description toggle and character limit, stock and price toggles, and currency symbol
- Buttons — Show/hide the “Go to Product” and “Add to Cart” buttons, customize their labels, and choose the cart button action
- Footer — Privacy Policy and Terms URLs (with custom link text) and a Manage Subscriptions link toggle
- Colors — Fine-grained per-element color control (see below)
Colors
Colors are split into five sub-sections so you only adjust what is relevant:
- Backgrounds — Email Background and Email Container Background
- Text — Title, Product Name, Description, and Price & Stock colors
- View Item Button — Background, Text, and Border colors
- Add to Cart Button — Background, Text, and Border colors
- Footer — Footer Text and Footer Link colors
The form hides any color picker that has no visible effect — for example, the Description color hides if “Show Product Description” is off, and the View Item Button and Add to Cart Button sub-sections hide entirely when their show toggles are off. The Footer Link color hides until you fill in a Privacy or Terms URL (or enable Manage Subscriptions).
Use the Final Preview action to see your finished email at full size before saving, or Send Test to send a real notification email to yourself.
Customizing Your Subscription Form
Customize the appearance of the subscription form that appears on your product pages.
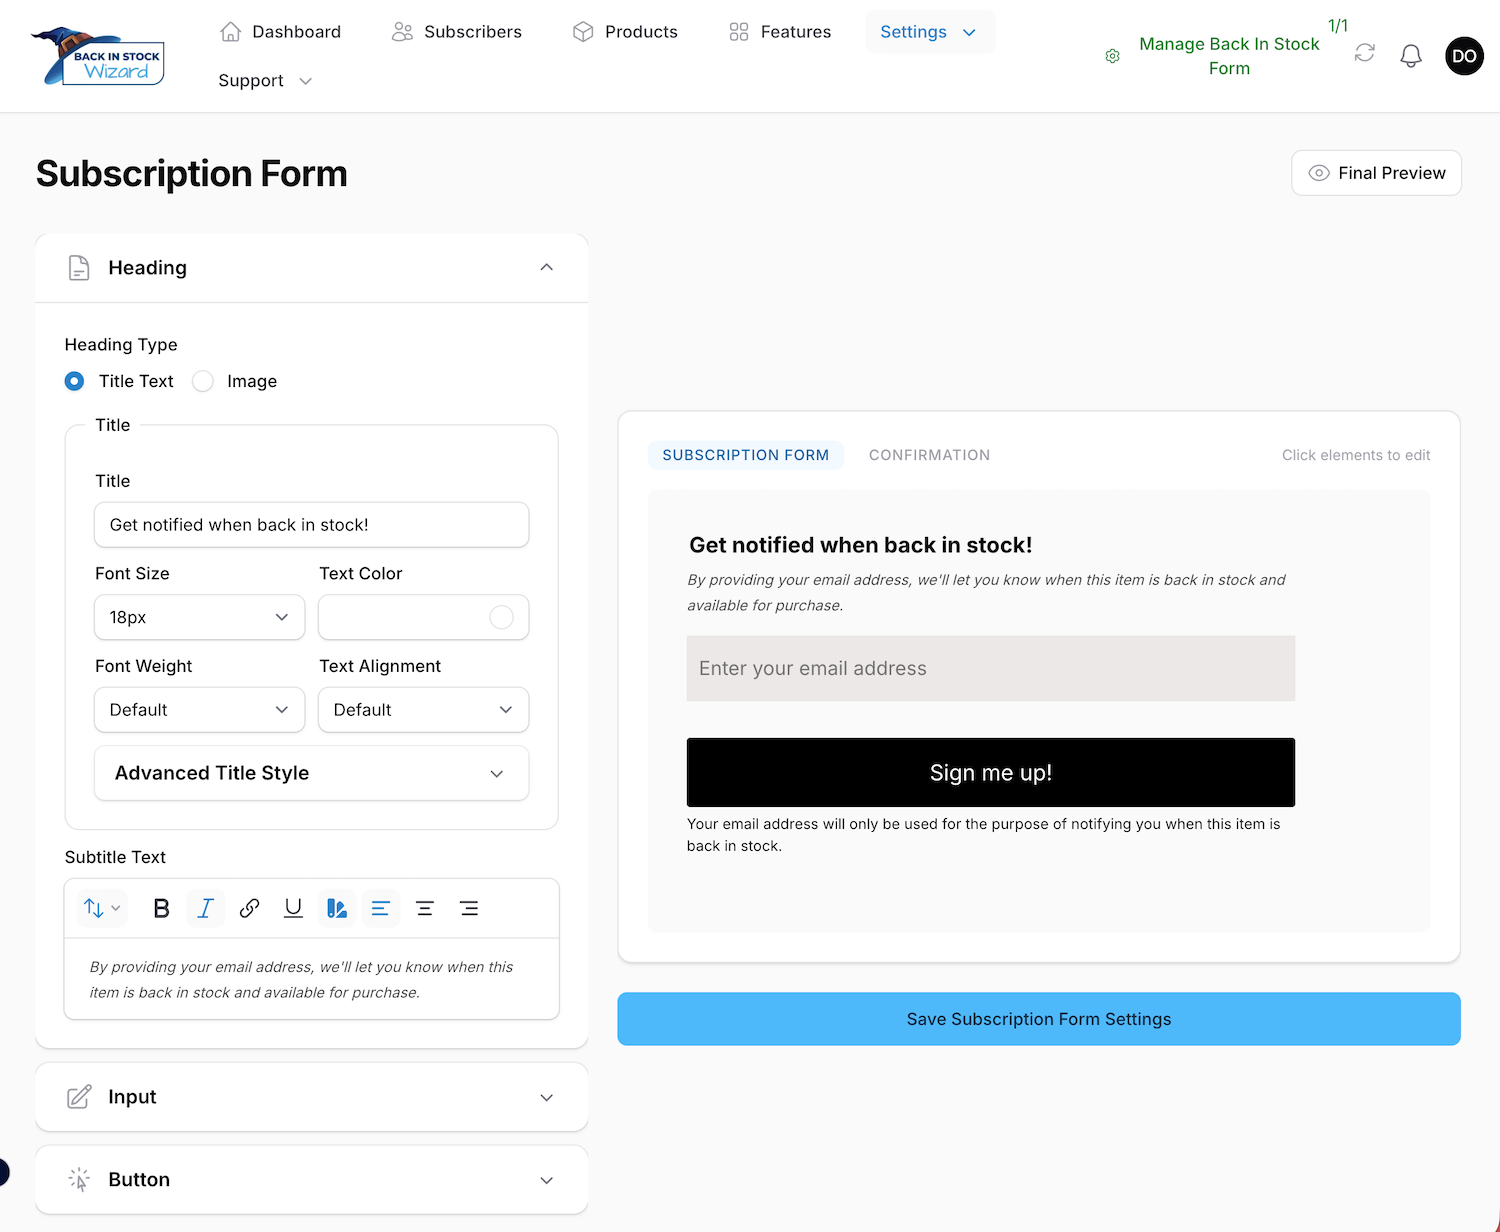
What you can customize:
- Heading — Choose between a text title or an image
- Subtitle — Add a subtitle below the heading using the rich text editor (font size, color, and other formatting are available in the toolbar)
- Input Field — Background color, text color, border style and color
- Button — Text, color, and width
- Title Styling — Font size, weight, and color
- Confirmation Message — The title and body text shown after a customer subscribes
- Custom CSS — Add your own CSS for advanced styling
- Custom JavaScript — Add your own JavaScript for advanced behavior
- Images — Upload custom images for the form
Changes are previewed in real-time as you make them.
Configuring Mail Settings
Configure a custom email domain so that notification emails are sent from your own domain (e.g., notifications@yourdomain.com) instead of a generic address.
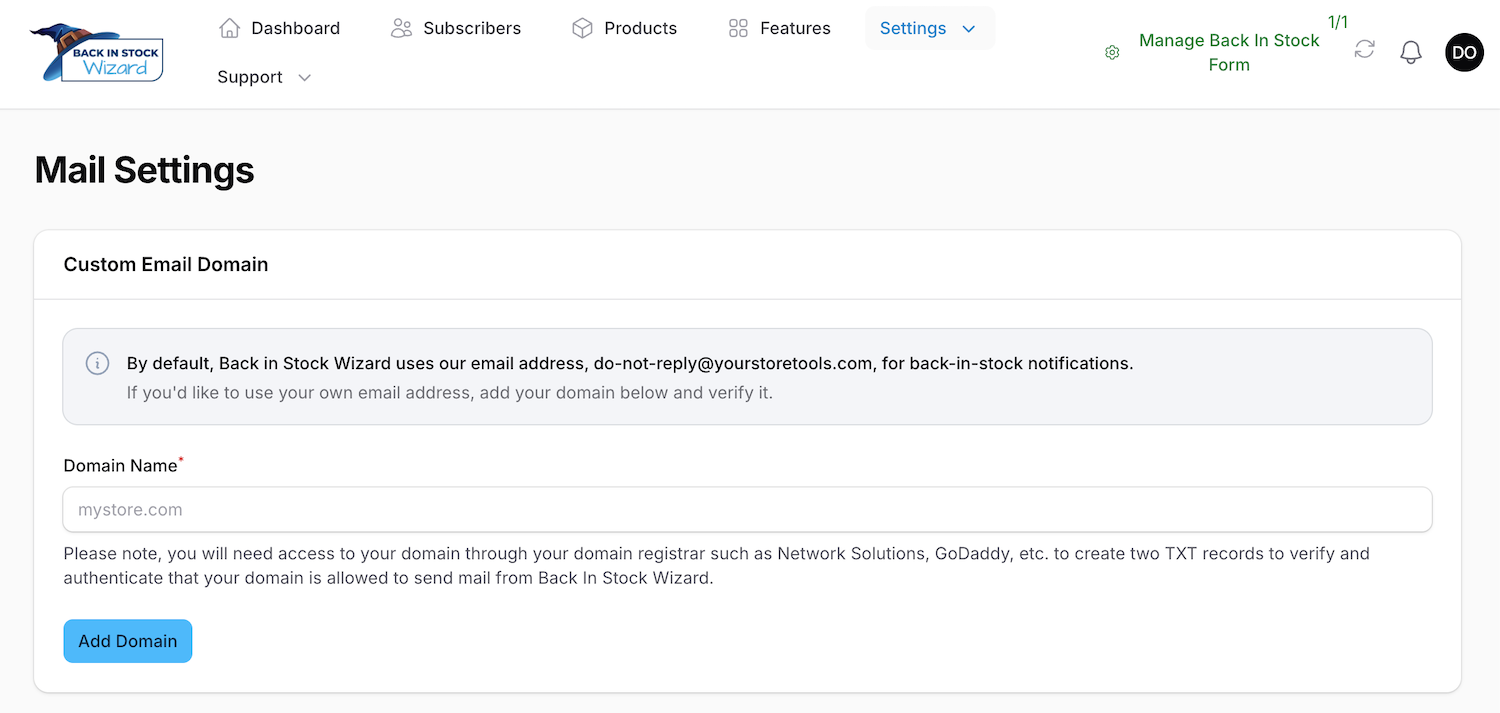
How to set up a custom domain:
- Enter your domain name and click Add Domain.
- The system will display the DNS records you need to add to your domain registrar:
- DKIM record — For email authentication
- SPF record — For sender verification
- DMARC record — For email policy
- Add these DNS records at your domain registrar or hosting provider.
- Click Verify Domain to check that the records are properly configured.
- Once verified, your emails will be sent from your custom domain.
You can also Remove Domain if you want to revert to the default sending address.
Importing / Exporting Subscription Data
Data Export
Export your active subscriber data as a CSV file.
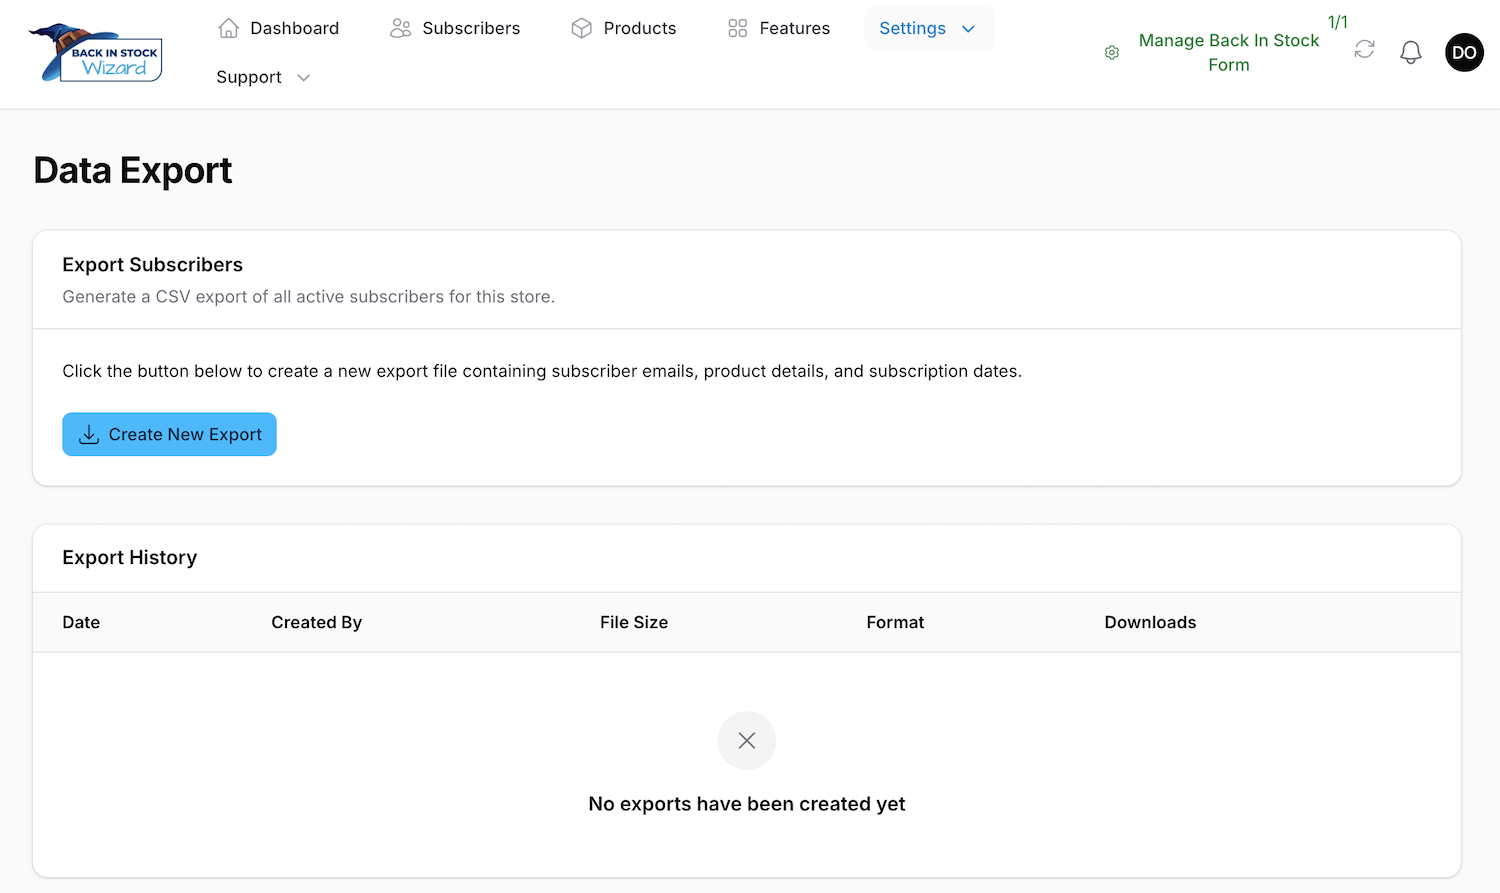
The export includes:
- Subscriber email address
- Product name
- Product SKU
- Subscription date
Click Export to generate the file. Previous exports are shown in the Export History table below, where you can download them again. Each export shows the date, who created it, file size, format, and download count.
Data Import
Import subscriber data from a CSV file to bulk-add subscriptions.
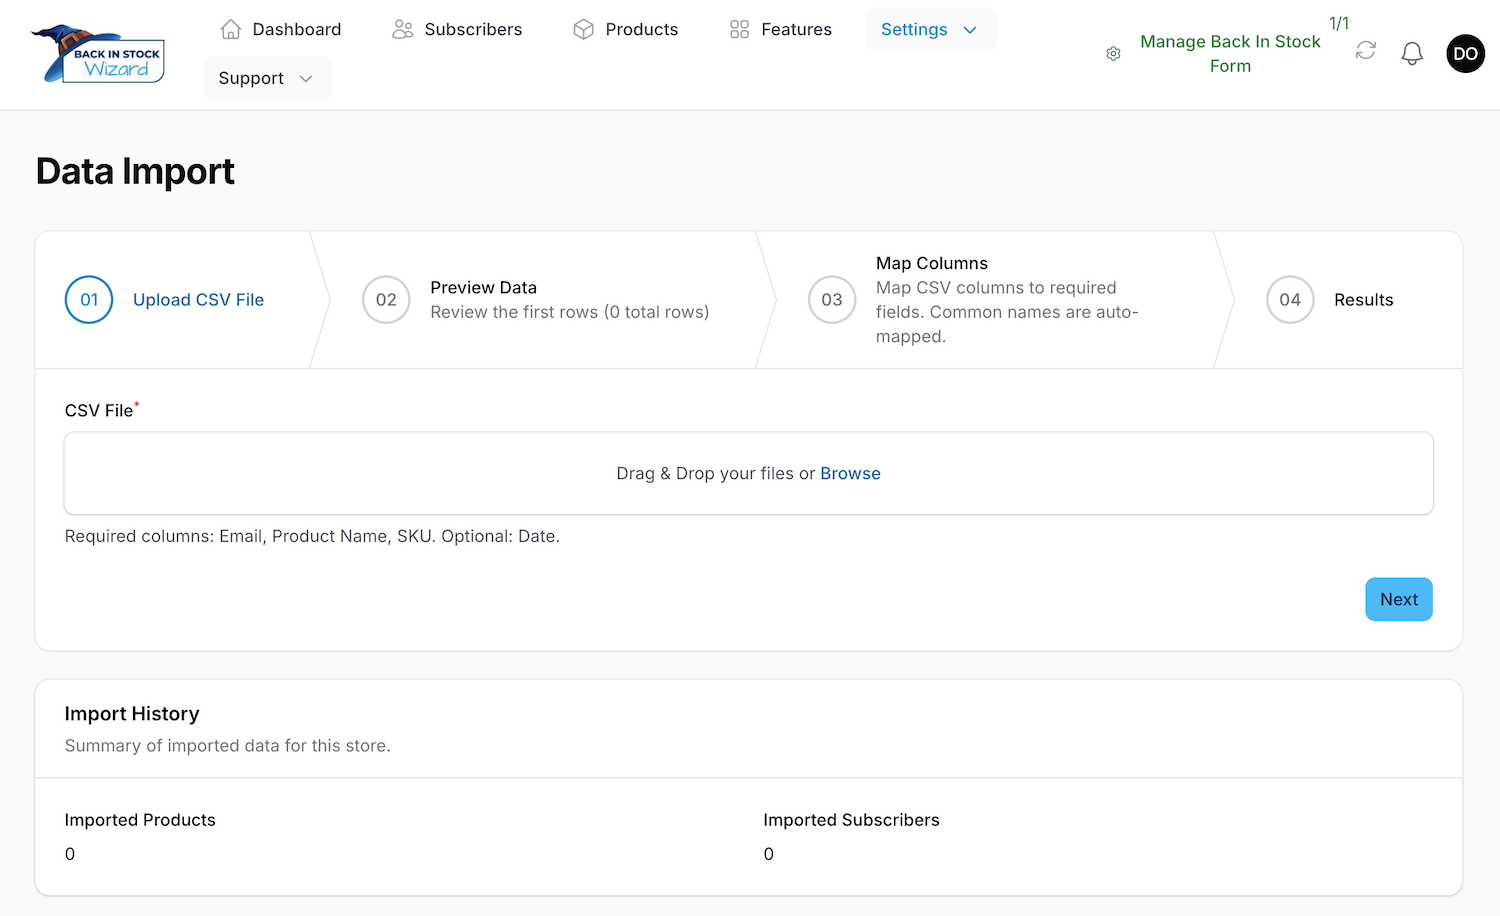
The import follows a three-step wizard:
- Upload — Select your CSV file. The file should contain columns for email, product name, SKU, and optionally a subscription date.
- Preview — Review the first few rows of your data and confirm the column mappings are correct.
- Complete — The import runs and shows you the results: how many were imported, how many were skipped, and any errors.
Setting Up WebDAV File Access (Optional)
This setting only appears if the WebDAV feature is enabled for your store and is optional.
Connect to your BigCommerce WebDAV file storage to upload images directly for use in email templates and subscription forms.

Configuration:
- WebDAV URL — Your BigCommerce WebDAV endpoint
- Username — Your WebDAV username
- Password — Your WebDAV password
- CDN URL — Automatically detected based on your WebDAV connection
Use the Test Connection button to verify your credentials are correct before saving.
View Your Billing Information
View your current subscription plan and payment details.
What you can see:
- Current Plan — Your plan name and price
- Next Billing Date — When your next payment is due
- Billing Status — Active, trial, past due, etc.
- Payment Method — Card type, last 4 digits, and expiration date
- Billing History — A table of all past charges including date, card used, amount, and status
Scheduling a Daily Report
This setting only appears if the Daily Report feature is enabled for your store.
Receive an automated daily summary email with your store’s subscription activity.
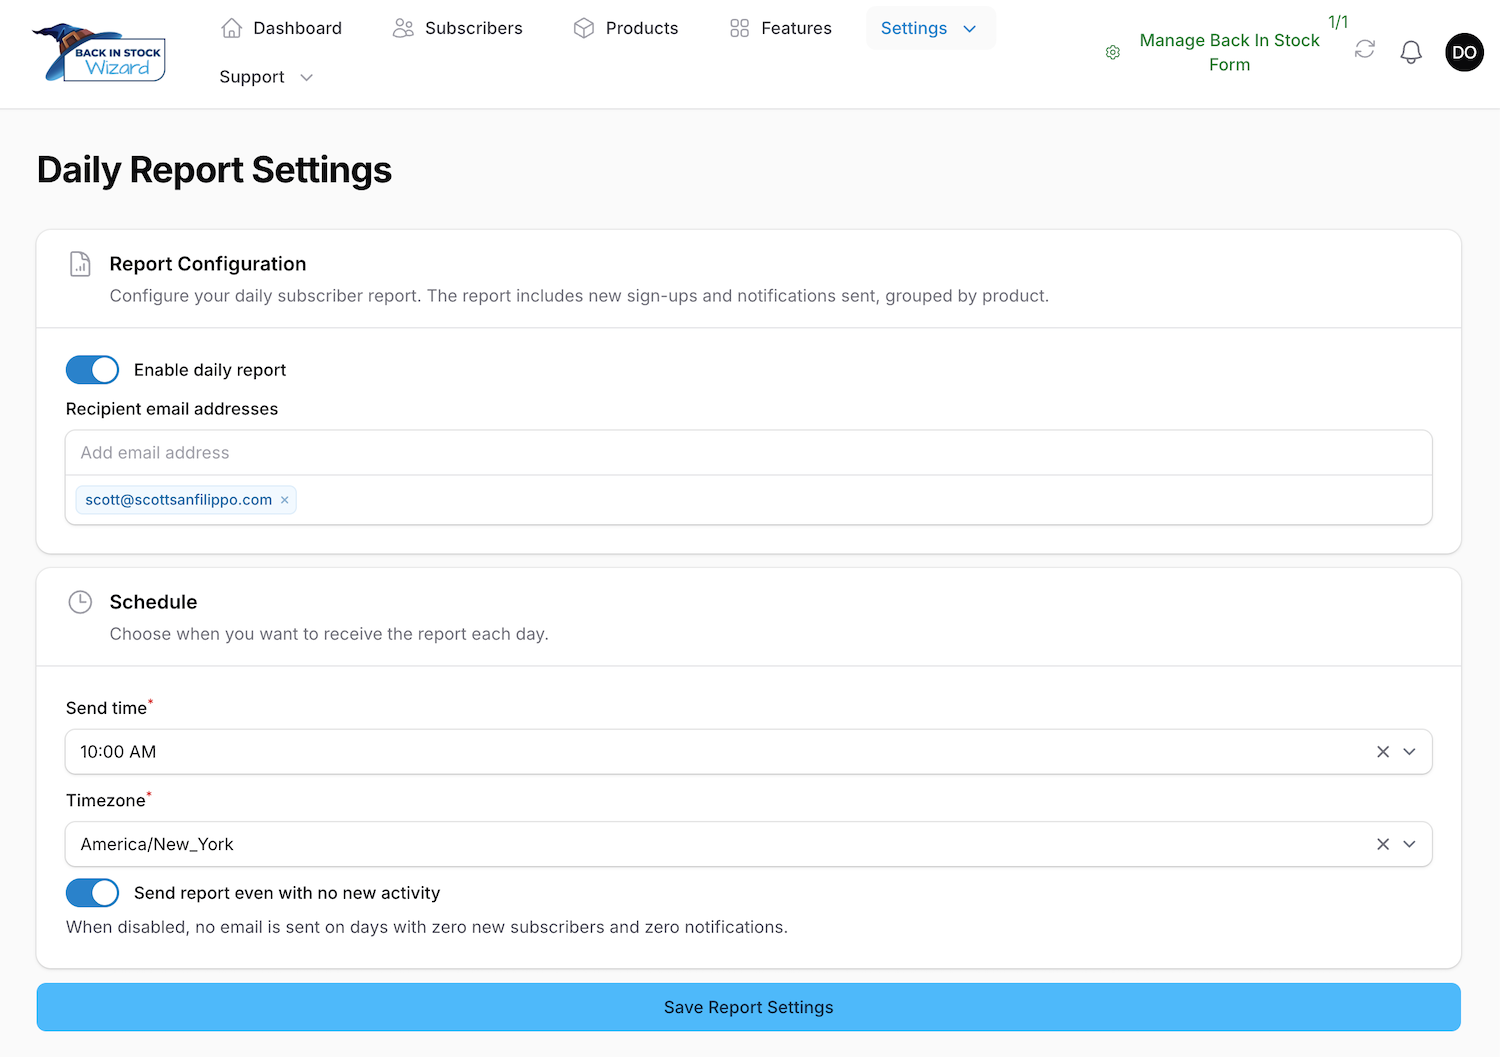
Configuration:
- Enable/Disable — Turn the daily report on or off
- Recipients — Enter one or more email addresses to receive the report
- Send Time — Choose the hour of day to send the report (0-23)
- Timezone — The timezone used for scheduling the report
Using with Multiple BigCommerce Stores
If you manage multiple BigCommerce stores with Back in Stock Wizard, you can switch between them without logging out.
Your current store is indicated in the interface. To switch to a different store:
- Navigate to the store selection page (accessible from the user menu if you have multiple stores).
- You will see a list of all stores linked to your account, showing the store name and store hash.
- Click Switch to this store next to the store you want to manage.
All pages and settings will update to reflect the selected store.